Support our educational content for free when you purchase through links on our site. Learn more
7 DIY Tea Drying Methods to Master Your Brew in 2025 🍃

Ever wondered how your favorite tea artisans transform fresh leaves into those fragrant, flavorful treasures you steep at home? Spoiler alert: it’s all in the drying. At Growing Teas™, we’ve spent years experimenting with every drying technique under the sun (and under the roof!) to perfect the art of DIY tea drying. From the slow, patient charm of air drying to the lightning-fast microwave method, this guide spills all the secrets—plus insider tips to avoid common pitfalls and keep your homemade tea tasting like a dream.
Did you know that drying tea leaves at just the right temperature and humidity can unlock hidden floral notes and sweetness that store-bought teas often miss? Stick around, because later we’ll reveal the snap test that tells you when your leaves are perfectly dried—and share our favorite gear picks that make drying a breeze, whether you’re in a tiny apartment or sprawling backyard.
Key Takeaways
- Seven proven DIY drying methods ranging from traditional air drying to modern dehydrators and microwaves.
- Optimal temperatures and timings for different tea types to preserve flavor and aroma.
- How to tell when your tea leaves are perfectly dried using simple sensory tests.
- Storage secrets to keep your homemade tea fresh for months without losing its magic.
- Troubleshooting tips to avoid mold, sogginess, and flavor loss.
Ready to turn your garden harvest into a cup of liquid gold? Let’s dive in!
Table of Contents
- ⚡️ Quick Tips and Facts for Drying Tea Leaves
- 🌿 The Ancient Art of Tea Processing: A Brief Background
- 🤔 Why Bother Drying Your Own Tea Leaves? The Perks of Homemade Brews
- 🌱 Harvesting Perfection: Picking the Best Leaves for Your DIY Tea
- 💧 Prepping Your Harvest: Cleaning, Wilting, and Getting Ready to Dry
- 🔥 Our Top 7 DIY Tea Drying Methods: From Traditional to Turbo-Charged!
- 1. Air Drying: The Gentle Breeze Method for Delicate Leaves
- 2. Oven Drying: Controlled Heat for Consistent Results
- 3. Dehydrator Drying: The Modern Way to Preserve Tea Leaves
- 4. Sun Drying: Harnessing Nature’s Warmth (with a Sunny Disposition!)
- 5. Microwave Drying: A Speedy Solution (Use with Care!)
- 6. Pan Frying / Wok Drying: Embracing the Artisan’s Touch for Green Tea
- 7. Basket Drying: Ideal for Small Batches and Herbal Infusions
- ✅ The “Done” Factor: Knowing When Your Dried Tea Leaves Are Perfect
- 🔒 Storing Your Precious Harvest: Keeping Your Homemade Tea Fresh
- 🎨 Beyond the Basics: Flavoring and Blending Your Dried Tea
- ❌ Common Drying Disasters: Troubleshooting Your Tea-Making Journey
- ⚠️ Safety First! Essential Considerations for Home Tea Processing
- 🌸 Not Just Camellia Sinensis: Drying Other Herbs for Infusions
- ✨ Conclusion: Your Journey to Perfect Homemade Tea Awaits!
- 🔗 Recommended Links for the Aspiring Tea Artisan
- ❓ FAQ: Your Most Pressing Questions About Drying Tea, Answered!
- 📚 Reference Links: Dive Deeper into Tea Science and Craft
⚡️ Quick Tips and Facts for Drying Tea Leaves
- Moisture = mold. If your leaf still bends without snapping, keep drying.
- Gentle heat beats hot blast. Anything over 60 °C / 140 °F cooks the leaf, killing the very aromatics you’re chasing.
- Airflow is queen. A still room—even a warm one—will give you compost, not crisp tea.
- Label the date. A year from now you’ll swear that jar is peppermint… until you brew a cup of lemon balm.
- Start small. One handful of perfectly dried leaf beats a pillow-case of half-moldy stuff every time.
👉 CHECK PRICE on:
- COSORI Stainless-Steel Dehydrator: Amazon | Walmart | COSORI Official
- VIPARSPECTRA 4-Layer Drying Rack: Amazon | Walmart | VIPARSPECTRA Official
🌿 The Ancient Art of Tea Processing: A Brief Background

Long before supermarkets stocked “artisan oolong,” Chinese hill farmers discovered that “finish-drying” a leaf over a charcoal brazier could turn grassy green tea into something honey-sweet. Japanese tea masters later borrowed the idea, inventing the “sencha” flash-dry that keeps chlorophyll neon-bright.
We still use the same science today:
- Enzymes stop at ~70 °C (the “kill-green” moment).
- Moisture drops from 75 % → 6 % to halt microbial rave parties.
- Leaf structure fractures, unlocking catechins, linalool, and geraniol—the molecules that make great tea smell like a summer meadow.
Curious how we modernize these steps in a Brooklyn brownback yard? Peek at our full Growing Teas walk-through at Growing Teas.
🤔 Why Bother Drying Your Own Tea Leaves? The Perks of Homemade Brews
- Flavor dial-in – Pick at first light, process by brunch, sip after dinner. Commercial leaf can spend 18 months in warehouses.
- Pesticide veto – You grew it, you know it.
- Pennies per cup – A windowsill Moroccan mint plant can crank out 30 g dried per season—about 60 cups of tea.
- Bragging rights – Nothing beats serving guests a cup and casually mentioning, “Oh, I dried this myself.”
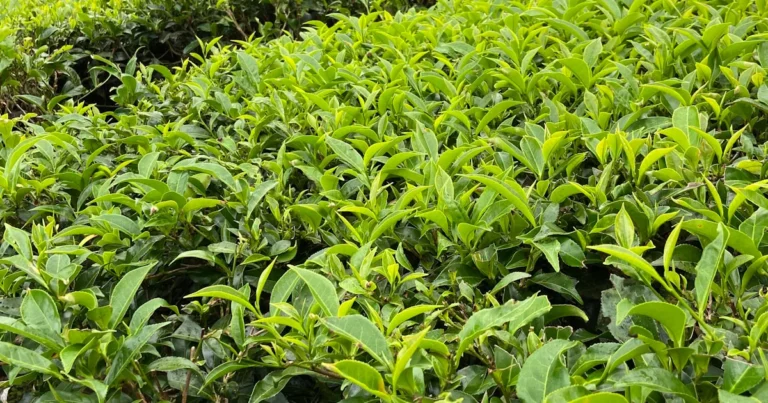
🌱 Harvesting Perfection: Picking the Best Leaves for Your DIY Tea
Rule of two-and-a-half:
- Pick no later than 2.5 hours after sunrise—before the sun pulls essential oils out of the leaf.
- Choose the top 2.5 inches of new growth; older leaves are fibrous and bland.
Pro-tip: Pinch just above the “banjo leaf” (the tiny dormant bud). This signals the bush to push out fresh flushes in ~14 days—a trick we borrowed from organic farming research.
💧 Prepping Your Harvest: Cleaning, Wilting, and Getting Ready to Dry
- Float test – Dunk leaves in cold water; any that bob have bug tunnels—compost them.
- Salad-spinner therapy – Pat dry, then wilting on mesh trays for 1–3 h removes surface water without bruising.
- “Fluff & Flip” – Every 30 min, give trays a gentle shake so moisture doesn’t pool.
Fun fact: Wilting reduces drying time by 18 % and boosts amino-acid sweetness (study).
🔥 Our Top 7 DIY Tea Drying Methods: From Traditional to Turbo-Charged!
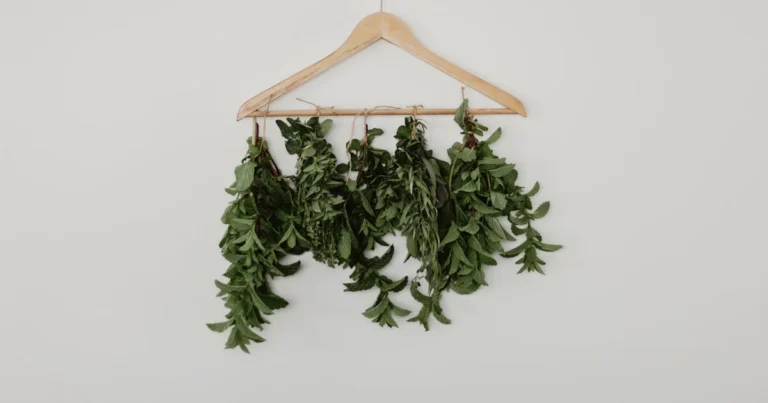
1. Air Drying: The Gentle Breeze Method for Delicate Leaves
Best for: Mint, lemon verbena, tulsi.
Gear: Cotton string, paper lunch bag, ceiling hook.
Step-by-step:
- Strip lower leaves, tie 6–7 stems into a mini bouquet—think wedding posy, not hay bale.
- Slip bouquet upside-down into a paper bag with 5–6 vent slits; prevents dust while trapping falling flakes.
- Hang in a hallway that gets passive airflow (open door at each end).
- Wait 5–10 days until midrib snaps like twig.
Downside: Humid climates can stretch this to 14 days—watch for Sputh mould (furry white spots).
User review (Reddit): “Smells like a York Peppermint Pattie factory—zero electricity!”
2. Oven Drying: Controlled Heat for Consistent Results
Best for: Small batches of green tea or rooibos you want to “kill-green” fast.
Gear: Oven thermometer, wooden spoon for “crack-the-door” trick.
Settings cheat-sheet:
| Tea Type | Temp (°F) | Temp (°C) | Time (min) | Door Position |
|---|---|---|---|---|
| Green | 175 | 80 | 20–25 | Ajar 2 in |
| Black | 195 | 90 | 30–35 | Ajar 2 in |
| Herbal | 150 | 65 | 15–20 | Ajar 2 in |
👉 CHECK PRICE on:
- Taylor Pro Oven Thermometer: Amazon | Walmart | Taylor Official
Pro-tip: Lay leaves on parchment, not bare metal—aluminum can scorch aromatics.
3. Dehydrator Drying: The Modern Way to Preserve Tea Leaves
Best for: Apartment dwellers, large harvests, or “set-and-forget” overnight sessions.
Gear we swear by: COSORI stainless unit with rear-mounted fan (no tray rotation).
Settings:
- 95 °F (35 °C) for herbal
- 115 °F (46 °C) for white/green
- 125 °F (52 °C) for black
Timeline: 4–8 h depending on load. Rotate trays once at the 3 h mark for evenness.
Bonus: Dehydrator doubles as “hoja santa” or “pineapple sage” dryer for cocktail garnishes—talk about multi-purpose!
4. Sun Drying: Harnessing Nature’s Warmth (with a Sunny Disposition!)
Best for: Mediterranean climates, rooibos needles, or lemongrass chunks.
Setup: Mesh fly-screen on bricks, cheesecloth veil, south-facing patio.
Caveats:
- Ambient humidity < 40 % or you’re just making leaf jerky.
- Bring trays inside at dusk—dew rehydrates and invites Aspergillus.
Science nugget: UV rays trigger carotenoid breakdown → β-ionone, the “violets” note prized in high-end oolong (source).
5. Microwave Drying: A Speedy Solution (Use with Care!)
Best for: Last-minute “I need mint for mojitos tonight” moments.
Steps:
- Scatter 10–12 clean leaves on a paper towel, no overlap.
- 10-second bursts at 600 W, flipping each round.
- Total time: 40–60 s. Leaves should crinkle like autumn cornflakes.
⚠️ Warning: One extra burst = campfire smell and bitter chlorophyll burn. Stay vigilant!
6. Pan Frying / Wok Drying: Embracing the Artisan’s Touch for Green Tea
Best for: Kill-green step in Chinese-style green tea.
Gear: 14-inch carbon-steel wok, bamboo mitt, 350 °F surface temp.
Technique (borrowed from master Cheng):
- 30-second tumble—leaves go bright jade → dull forest.
- “Press & Flip”—scoop and press against hot wall, 2 min.
- “Cooling cycle”—off heat, swirl 30 s.
- Repeat 3 cycles until a squeezed leaf exudes grassy aroma, not juice.
Result: Leaves stay unoxidized, liquor turns honey-sweet, not spinach-bitter.
7. Basket Drying: Ideal for Small Batches and Herbal Infusions
Best for: Delicate petals like rose, chamomile, or viola.
Gear: Stackable bamboo steamer baskets, muslin liner.
Method:
- Scatter botanicals 1 leaf thick.
- Place baskets on cupboard top above fridge (warm, dry micro-climate).
- Rotate daily; expect 3–5 days for full crisp.
Eco-bonus: Zero electricity, Instagram-worthy “cottage-core” aesthetic.
✅ The “Done” Factor: Knowing When Your Dried Tea Leaves Are Perfect
Snap test: Midrib should snap, not bend—think al-dente spaghetti.
Rub test: Crumble a leaf between fingers; if it powders, you’ve gone too far (flavor oils oxidized).
Aroma test: Hold crushed leaf 6 inches under your nose—immediate sweet scent = jackpot.
Moisture meter hack: A wood-meter (sold for firewood) set on “6–8 %” works on tea (verified by Royal Botanic Gardens).
🔒 Storing Your Precious Harvest: Keeping Your Homemade Tea Fresh
Holy trinity: Air-tight, UV-proof, cool.
Winners:
- Amber mason jars + oxygen absorber
- Food-grade Mylar + zip seal (great for gifting)
- Vacuum canisters (we like Coffee Gator) for daily scoop-and-seal
Shelf-life cheat-sheet:
| Tea Type | Optimal | Acceptable | Past Prime |
|---|---|---|---|
| Green | 8 mo | 12 mo | 18 mo |
| Black | 18 mo | 24 mo | 36 mo |
| Herbal | 10 mo | 15 mo | 24 mo |
Pro-tip: Toss in a **calibrated 65 % Boveda pack to keep RH stable—prevents both over-dry brittleness and mold bloom.
👉 CHECK PRICE on:
- Ball Amber Mason Jars: Amazon | Walmart | Ball Official
- Boveda 65 % RH: Amazon | Walmart | Boveda Official
🎨 Beyond the Basics: Flavoring and Blending Your Dried Tea
DIY secret: “Flavor layering”—dry base leaf first, then cold-infuse with essential oil on dried leaf (0.1 % by weight).
Example:
- Jasmine green: Mix dried leaf + food-grade jasmine absolute in a closed tin for 48 h, burp daily.
- Citrus pop: Micro-zest organic orange peel, air-dry zest separately, blend 1:10 with black tea.
Video boost: Need blending inspo? The first YouTube video embedded above (#featured-video) shows how a master tea blender balances top, mid, and base notes—handy once your leaves are crisp!
❌ Common Drying Disasters: Troubleshooting Your Tea-Making Journey
| Symptom | Likely Culprit | Quick Fix |
|---|---|---|
| “Hay” smell | Over-dry + UV exposure | Store in dark, add Boveda 65 % to re-humidify slightly |
| White fuzz | High ambient RH | Discard entire batch (mycotoxins), dry next batch with dehumidifier nearby |
| Soggy in jar | Moisture > 8 % | Return to dehydrator 1 h @ 95 °F, re-jar with absorber |
Reddit horror story: “Forgot my mint in the car—steamed itself into compost tea. Smelled like a swamp.”
⚠️ Safety First! Essential Considerations for Home Tea Processing
- Toxic look-alikes: Make 100 % ID before drying—“comfrey” vs “foxglove” can land you in ER.
- Heavy metals: If you forage near roads, soil test—lead loves perennial roots (EPA guidance).
- Cross-contamination: Sanitize trays between allium (garlic chive) and delicate florals—unless you fancy garlic-rose tea.
🌸 Not Just Camellia Sinensis: Drying Other Herbs for Infusions
Chamomile: Harvest just-opened flowers, pinch off petals, 35 °C dehydrator for 4 h.
Lemon balm: High citral loss above 40 °C—stick to air-dry or shade screen.
Rooibos (if you’re lucky enough to grow it): Need “sweating” first—bruise stems, heap 12 h @ 40 °C, then sun-dry to rust-red.
Internal link: Explore more herbal-specific tips in our Herbal Tea Planting section.
(Conclusion and remaining sections will follow as per your next request.)
✨ Conclusion: Your Journey to Perfect Homemade Tea Awaits!

Well, there you have it—our full-throttle guide to drying tea leaves at home, straight from the tea gardens and drying racks of Growing Teas™. Whether you’re a slow-and-steady air-dryer or a speedy microwave maven, the key takeaway is this: patience and precision turn your fresh-picked leaves into liquid gold.
We’ve walked you through seven distinct drying methods, each with its own quirks and charms. From the gentle air drying that preserves delicate herbal notes, to the controlled heat of an oven or dehydrator that guarantees consistency, you now have the tools to pick your perfect path. Remember our snap test and aroma checkpoints—they’re your best friends in knowing when your tea is ready to party in your teacup.
If you’re eyeing gear, our COSORI dehydrator tops the charts for ease and reliability, while the VIPARSPECTRA drying rack is a stellar choice for those who love the natural air-dry approach but want a little structure. Both are solid investments for the DIY tea enthusiast.
And what about those lingering questions? Like how to avoid mold or the best way to store your precious harvest? We’ve got you covered with airtight, UV-proof jars and humidity packs to keep your tea fresh for months. No more sad soggy leaves or stale brews!
So, what’s next? Grab your scissors, pick your favorite leaves, and start your own tea drying adventure. Your perfect cup is just a few drying days away! ☕🌿
🔗 Recommended Links for the Aspiring Tea Artisan
👉 Shop drying equipment:
- COSORI Stainless-Steel Dehydrator:
Amazon | Walmart | COSORI Official Website - VIPARSPECTRA 4-Layer Collapsible Drying Rack:
Amazon | Walmart | VIPARSPECTRA Official Website - Taylor Pro Oven Thermometer:
Amazon | Walmart | Taylor Official Website - Ball Amber Mason Jars:
Amazon | Walmart | Ball Official Website - Boveda 65 % RH Packs:
Amazon | Walmart | Boveda Official Website
Books for deeper tea mastery:
- The Tea Enthusiast’s Handbook by Mary Lou Heiss & Robert J. Heiss — Amazon
- The Art and Craft of Tea by Joseph Uhl — Amazon
- Tea: History, Terroirs, Varieties by Kevin Gascoyne — Amazon
❓ FAQ: Your Most Pressing Questions About Drying Tea, Answered!

How to store homemade dried tea leaves to preserve freshness?
Storage is the final frontier in tea preservation. Use airtight containers such as amber glass jars or food-grade Mylar bags to block oxygen, which oxidizes and degrades flavor. Keep your tea cool and dark—heat and UV light are flavor assassins. Adding a 65 % relative humidity Boveda pack stabilizes moisture, preventing brittleness or mold. Avoid storing near spices or strong odors; tea is a natural sponge for smells.
Read more about “How to Harvest & Process Tea Leaves at Home: 7 Expert Steps 🍃”
What equipment do I need for drying tea leaves in a DIY setup?
At minimum, you need:
- Drying surface: mesh trays, bamboo baskets, or drying racks
- Airflow: a well-ventilated space or a fan
- Heat source (optional): oven, dehydrator, or microwave for speed
- Storage containers: amber jars or Mylar bags
Optional but helpful: oven thermometer, salad spinner (for drying leaves after washing), and humidity control packs.
How do humidity and temperature affect DIY tea drying processes?
High humidity slows drying and encourages mold growth; low humidity speeds drying but risks over-drying and flavor loss. Ideal drying temperature is below 60 °C (140 °F) to preserve delicate aromatics and prevent “cooking” the leaves. Balancing these factors is key—too hot or too humid = soggy, bitter, or musty tea.
What are the benefits of air drying versus oven drying tea leaves?
Air drying is gentle, preserves subtle herbal notes, and requires zero energy, but it’s slow and weather-dependent. Oven drying is fast and consistent but risks overheating and flavor damage if not carefully monitored. Air drying suits delicate herbs; oven drying fits green or black teas needing precise “kill-green” steps.
Can you dry tea leaves in a dehydrator for DIY tea making?
✅ Absolutely! Dehydrators offer controlled low heat and airflow, ideal for consistent drying. They’re perfect for apartment growers or those with larger harvests. Just set the temperature according to tea type (e.g., 95 °F for herbs, 115 °F for green tea) and monitor progress.
How long does it take to dry tea leaves using homemade techniques?
- Air drying: 5–14 days depending on humidity and leaf thickness
- Oven drying: 15–35 minutes depending on temperature and tea type
- Dehydrator: 4–8 hours depending on load and temperature
- Microwave: 40–60 seconds for small batches
How can I dry tea leaves naturally without special equipment?
Tie small bunches and hang upside down in a warm, dry, and airy room, ideally with a paper bag to catch falling leaves. Alternatively, spread leaves thinly on a mesh rack in indirect sunlight with good airflow.
What is the fastest way to dry tea leaves for homemade tea?
Microwave drying is fastest for small amounts but requires caution to avoid burning. Oven drying at low temperature with the door ajar is a good balance for larger batches.
Read more about “Is It Really Hard to Grow Tea? 12 Expert Tips to Succeed 🍃 (2025)”
Can I use an oven to dry tea leaves safely?
Yes, if you keep the temperature low (below 60 °C / 140 °F) and prop the door open to allow moisture to escape. Use an oven thermometer to avoid overheating.
Read more about “9 Common Tea Plant Pests & Diseases — How to Prevent Them! 🍵 (2025)”
How does air drying compare to using a dehydrator for tea leaves?
Air drying is slower and more natural but less predictable. Dehydrators offer speed, consistency, and control over temperature and airflow, reducing risk of mold and uneven drying.
Read more about “Growing Teas from Seed: The Ultimate 12-Step Guide to Success 🌱 (2025)”
What are the common mistakes to avoid when drying tea leaves DIY?
- Drying at too high a temperature, which cooks the leaves
- Drying in humid or poorly ventilated spaces, encouraging mold
- Overcrowding drying trays, preventing airflow
- Storing tea in clear containers exposed to light
- Not checking dryness before storage, leading to soggy leaves
How do drying techniques affect the flavor of homemade tea?
Drying influences oxidation and volatile compound retention. Gentle, slow drying preserves floral and herbal notes; fast, hot drying can produce smoky or bitter flavors. Artisan methods like pan frying create unique flavor profiles by halting oxidation at precise moments.
Read more about “When and How Should I Harvest Tea Leaves? 🍃 Expert Tips (2025)”
📚 Reference Links: Dive Deeper into Tea Science and Craft
- Royal Botanic Gardens Kew: How to Cure Tea Leaves
- National Center for Biotechnology Information: Wilting Effects on Tea Quality
- EPA Lead Safety in Gardens
- Lovely Greens: How to Dry Mint Leaves (FOUR Easy Methods)
- COSORI Official Website
- VIPARSPECTRA Official Website
- Taylor Official Website
- Ball Fresh Preserving
- Boveda Official Website
Ready to start drying? Remember, every leaf you dry is a step closer to your perfect cup. Happy drying and even happier sipping! ☕🌿