Support our educational content for free when you purchase through links on our site. Learn more
Mastering Tea Plant Care and Maintenance: 12 Expert Tips for 2025 🍃

Did you know that the humble tea plant, Camellia sinensis, is the source of every cup of green, black, white, and oolong tea you sip? Growing your own tea might sound like a lofty dream reserved for tropical estates, but with the right care and a sprinkle of patience, anyone can cultivate this ancient, aromatic treasure right at home.
In this guide, we’ll unravel the secrets of tea plant care and maintenance—from selecting the perfect variety and soil prep to pruning like a pro and battling pesky pests organically. Curious about how to coax your tea plant into blooming or how to harvest those tender “two leaves and a bud” for your first homemade brew? We’ve got you covered. Whether you’re a seasoned gardener or a curious newbie, our expert tips will help you grow a thriving tea garden that rewards you with fresh leaves and a deep connection to tea’s rich heritage.
Key Takeaways
- Choose the right tea variety (sinensis for cooler climates, assamica for warmer) to match your environment and tea preferences.
- Maintain acidic, well-draining soil (pH 4.5–5.5) and provide balanced sunlight with afternoon shade in hotter zones.
- Prune regularly to encourage bushy growth and maximize leaf yield; create a “plucking table” for easy harvesting.
- Water consistently but avoid waterlogging—good drainage is essential to prevent root rot.
- Use organic fertilizers like fish emulsion and Espoma Holly-tone for lush, healthy foliage.
- Protect your tea plant in winter with mulching, indoor overwintering, or frost cloths depending on your zone.
- Control pests organically using neem oil, insecticidal soap, and good cultural practices.
- Harvest the tender “two leaves and a bud” for the best flavor and health benefits.
Ready to start growing your own tea? Check out our recommended organic fertilizers, soil amendments, and pest control products to get your garden brewing:
- Espoma Holly-tone Fertilizer: Amazon | Walmart
- Neptune’s Harvest Fish Fertilizer: Amazon | Walmart
- Neem Oil: Amazon | Walmart
Dive in and cultivate your own cup of history and flavor! 🍵
Table of Contents
- ⚡️ Quick Tips and Facts
- 🌿 The Verdant Legacy: A Brief History of Camellia sinensis Cultivation
- Choosing Your Green Companion: Understanding Camellia sinensis Varieties
- The Perfect Home: Site Selection and Soil Preparation for Thriving Tea Plants
- Planting Your Tea Dream: From Seed to Sapling
- 💧 Watering Wisdom: Hydration for Happy Tea Plants
- 🌱 Feeding Your Foliage: Fertilization for Robust Growth
- ✂️ The Art of Shaping: Pruning for Health and Harvest
- 🏡 Potting Up: Container Cultivation for Tea Enthusiasts
- ❄️ Winter Woes: Protecting Your Tea Plant from the Cold
- 🐛 Battling the Blight: Common Pests and Diseases of Tea Plants
- 🌸 The Elusive Bloom: Encouraging Flowers on Your Tea Plant
- 🌿 From Bush to Brew: Harvesting Your Own Tea Leaves
- ❓ Troubleshooting Your Tea Plant: Common Problems and Solutions
- Conclusion: Your Journey to a Thriving Tea Garden
- Recommended Links: Dive Deeper with Growing Teas™
- FAQ: Your Most Pressing Tea Plant Questions Answered
- Reference Links: Our Trusted Sources
Here is the main body content for your blog post, crafted by the expert team at Growing Teas™.
⚡️ Quick Tips and Facts
Welcome, future tea baron! Before we dive deep into the lush world of Camellia sinensis, let’s get you started with some quick sips of wisdom. Growing your own tea isn’t just a gardening project; it’s a journey into a cup. And contrary to what you might think, the answer to “How hard is tea to grow?” is: surprisingly manageable, with a few key secrets! We’re here to spill them all.
- Patience is a Virtue: It takes about three years for a tea plant to mature enough for a proper harvest. Think of it as a long, slow steep to perfection.
- Acid is Awesome: Tea plants are acid-loving fiends! They crave a soil pH between 4.5 and 5.5. Get this wrong, and your plant will give you the silent treatment.
- One Plant, Many Teas: Believe it or not, green, black, oolong, white, and pu-erh teas all come from the exact same plant: Camellia sinensis. The difference is all in the harvesting and processing.
- Don’t Fear the Shears: Pruning is your best friend. Regular trimming encourages a bushy, leafy plant, which means more tea for you!
- Thirsty, Not Drowning: These plants love consistent moisture but despise “wet feet.” Good drainage is non-negotiable.
Here’s a quick reference table to keep handy:
| Feature | Specification | Growing Teas™ Pro-Tip |
|---|---|---|
| Botanical Name | Camellia sinensis | Remember this name; it’s your new best friend. |
| Hardiness Zones | 7-9 (USDA) | Some cultivars can push into Zone 6 with protection. |
| Mature Size | 6-15 ft. tall (unpruned) | We’ll teach you to keep it a manageable 3-5 ft. bush. |
| Sun Exposure | Full sun to partial shade | Afternoon shade is a lifesaver in hotter climates. |
| Soil Type | Acidic, loamy, well-draining | Think of the soil like a well-made scone: rich but crumbly. |
| Bloom Time | Autumn to early winter | The flowers are lovely, but the leaves are the prize! |
🌿 The Verdant Legacy: A Brief History of Camellia sinensis Cultivation

Every time you sip a cup of tea, you’re tasting history. The story of Camellia sinensis is a sprawling epic of emperors, monks, explorers, and, well, us! Legend has it that in 2737 BC, the Chinese emperor Shen Nung was boiling water when leaves from a nearby tea plant drifted into his pot. He drank the resulting infusion and, voilà, tea was born!
While that’s a charming tale, the real history of tea is rooted in the mountainous regions of Southwest China, Tibet, and Northeast India, where the plant grew wild. For centuries, it was used as a medicinal beverage by Buddhist monks to aid in meditation. It wasn’t until the Tang Dynasty (618-907 AD) that tea became a beloved recreational drink, spreading throughout Asia and eventually, the world.
The journey of this single plant has shaped economies, sparked wars (hello, Boston Tea Party!), and defined cultures. When you plant a Camellia sinensis in your garden, you’re not just growing a shrub; you’re planting a piece of living history. You’re becoming part of a tradition that’s thousands of years old. No pressure! 😉
Choosing Your Green Companion: Understanding Camellia sinensis Varieties
So, you’re ready to adopt a tea plant. But which one? Just like choosing a puppy, it’s important to know the breed! The two main rockstars of the tea world are Camellia sinensis var. sinensis and Camellia sinensis var. assamica. Think of them as the yin and yang of tea.
Assamica vs. Sinensis: The Great Divide
Your climate and the type of tea you dream of making will heavily influence your choice. Here at Growing Teas™, we have a soft spot for both, but for different reasons.
| Feature | Camellia sinensis var. sinensis (Chinese Tea) | Camellia sinensis var. assamica (Assam/Indian Tea) |
|---|---|---|
| Leaf Size | Small, narrow, and delicate (1-2 inches) | Large, broad, and robust (3-5 inches) |
| Growth Habit | Slower-growing, multi-stemmed shrub | Faster-growing, single-trunked tree (if unpruned) |
| Climate Preference | Cooler, mountainous regions; more cold-tolerant | Hot, humid, tropical lowlands; loves the heat |
| Best For | Delicate green and white teas | Bold, malty black teas and pu-erh |
| Hardiness | Generally hardy to USDA Zone 7, sometimes 6b | Generally hardy to USDA Zone 8 and higher |
| Caffeine Content | Lower | Higher |
Most beginners, especially those in temperate climates, will have more success with the sinensis variety. It’s more forgiving of cooler temperatures and its compact size is ideal for container gardening.
Beyond the Basics: Other Notable Cultivars
The world of tea is vast! Beyond the big two, there are thousands of cultivars bred for specific characteristics. A popular one you might encounter is:
- Camellia sinensis ‘Rosea’: As The Spruce notes, this cultivar is a show-off, known for its “profuse soft pink flowers and burgundy new growth.” It’s a great choice if you want an ornamental plant that also produces tea leaves. It’s also quite cold-hardy, making it a solid option for growers on the edge of Zone 6.
The Perfect Home: Site Selection and Soil Preparation for Thriving Tea Plants
Location, location, location! It’s true for real estate, and it’s doubly true for your tea plant. Get this part right, and you’re 80% of the way to a happy plant.
Sunlight Secrets: How Much is Just Right?
Tea plants are like sunbathers who still appreciate a good parasol. They need a good amount of light to produce those flavorful leaves, but they can scorch in relentless, direct heat.
- ✅ Zones 6-7: Aim for at least 6 hours of direct sunlight. A spot with morning sun and some afternoon shade is the sweet spot.
- ✅ Zones 8-9: As The Spruce advises, “2 to 6 hours of direct light and several hours of afternoon shade” is ideal. The intense afternoon sun in hotter climates can be too much for your plant to handle.
- ❌ Full Shade: A plant in deep shade will be leggy, sparse, and produce lackluster leaves. Avoid it.
Soil Science: Crafting the Ideal Acidic Environment
This is the big one. The secret sauce. Tea plants MUST have acidic soil. We can’t stress this enough. Most garden soils are neutral to alkaline. As PictureThis AI points out, tea thrives in “acidic, well-draining soil” with a pH of 4.5 to 5.5.
How to get there:
- Test Your Soil: Don’t guess! A simple soil pH test kit is your best investment. The Spruce rightly says, “Most soils are higher in alkalinity so a soil test is worthwhile before planting.”
- Amend, Amend, Amend: If your soil is too alkaline (pH above 6.0), you’ll need to lower it.
- Our Go-To Method: Mix in generous amounts of organic matter like peat moss, pine bark fines, or composted oak leaves. Minto Island Tea Company recommends a mix of “50% peat moss, 25% compost, and 25% perlite” for pots, which is a fantastic recipe.
- For Quicker Results: Use a soil acidifier containing elemental sulfur, like Espoma Soil Acidifier. Follow the package directions carefully!
- For Container Growers: You have total control! Use a high-quality potting mix designed for acid-loving plants like azaleas, rhododendrons, or blueberries. We love Miracle-Gro Potting Mix for Azalea, Camellia, Rhododendron.
👉 Shop Soil Amendments:
- Espoma Soil Acidifier: Amazon | Walmart
- Canadian Sphagnum Peat Moss: Amazon | Walmart
- Perlite: Amazon | Etsy
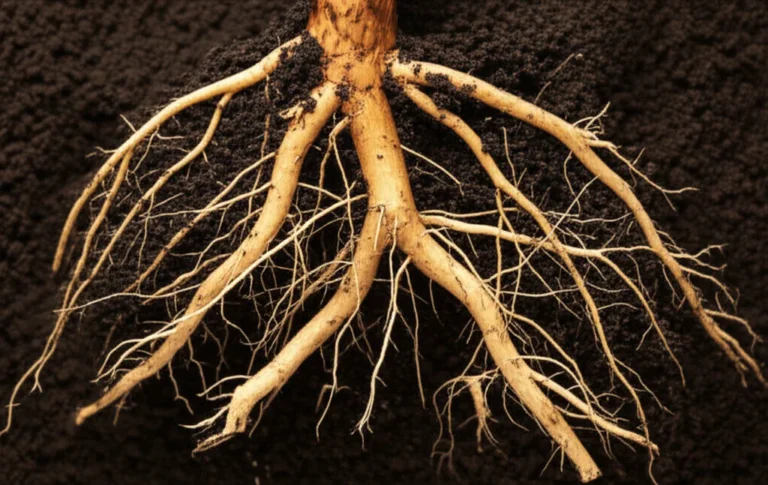
Drainage Drama: Avoiding Soggy Roots
Imagine wearing wet socks 24/7. That’s how your tea plant feels in poorly draining soil. It leads to root rot, the silent killer of many a good plant.
- In the Ground: If you have heavy clay soil, amend it heavily with compost and pine bark fines to improve its structure. Planting on a slight slope or in a raised bed is also a brilliant move.
- In a Pot: This is non-negotiable. Your pot must have drainage holes. Lots of them. No exceptions!
🌱 Planting Your Tea Dream: From Seed to Sapling
You’ve got your spot, your soil is perfectly acidic… now for the main event! You can start from a tiny seed or get a head start with a young plant.
Starting from Seed: A Journey of Patience
Growing from seed is incredibly rewarding, but it’s a long game. Tea seeds have a notoriously short viability, so source them from a reputable dealer and plant them ASAP.
- Soak ’em: Soak the hard seeds in warm water for 24-48 hours. This softens the outer shell and signals that it’s time to wake up.
- Plant ’em: Plant the seeds about one inch deep in a well-draining, acidic seed-starting mix.
- Keep ’em Warm & Moist: Cover the pot with a plastic dome or bag to maintain humidity. Keep the soil consistently moist (but not soggy!) and warm, around 70-75°F (21-24°C). A heat mat can work wonders.
- Wait… and Wait: Germination can take anywhere from one to three months. See? Patience!
- First Light: Once you see a sprout, remove the plastic cover and move the seedling to a spot with bright, indirect light.
Nursery Starts: Instant Gratification
For most people, we recommend starting with a 1- or 2-year-old plant from a nursery. This skips the tricky germination phase and gets you years closer to your first harvest.
- Dig the Hole: Dig a hole that is twice as wide and just as deep as the pot the plant came in.
- Tease the Roots: Gently remove the plant from its container. If the roots are tightly wound in a circle (root-bound), gently tease them apart with your fingers. This encourages them to grow outwards into their new home.
- Set the Height: Place the plant in the hole. The top of the root ball should be level with or slightly above the surrounding soil. Planting too deep is a common and fatal mistake!
- Backfill and Water: Fill the hole with your amended acidic soil, gently tamping it down to remove air pockets. Water thoroughly to help the soil settle.
- Mulch: Apply a 2-3 inch layer of organic mulch (pine needles, shredded bark, or wood chips) around the base of the plant, but keep it a few inches away from the stem to prevent rot.
💧 Watering Wisdom: Hydration for Happy Tea Plants
Watering seems simple, but it’s an art form. The goal is to keep the soil consistently moist, like a wrung-out sponge.
The Goldilocks Zone: Not Too Much, Not Too Little
- Overwatering (❌): The #1 killer of container plants. Signs include yellowing leaves that fall off easily, mushy stems, and a general look of despair. It suffocates the roots.
- Underwatering (❌): Signs include wilting, crispy brown leaf edges, and leaf drop.
- Just Right (✅): Water deeply whenever the top 1-2 inches of soil feel dry to the touch. For potted plants, this might be every few days in the summer. For in-ground plants, a deep watering once a week is a good starting point, depending on rainfall.
A moisture meter can be a helpful tool, but your finger is the original and best moisture sensor!
Water Quality Matters: pH and Chlorine Considerations
Are you a water snob? Your tea plant is.
- Tap Water: Most municipal tap water is slightly alkaline to protect pipes. Over time, this can raise the pH of your soil, especially in pots. If you notice your plant struggling, your tap water could be the culprit. Letting tap water sit out for 24 hours can help dissipate some of the chlorine.
- Rainwater: This is the champagne of waters for tea plants. It’s naturally soft and slightly acidic. If you can set up a rain barrel, your plants will thank you with lush growth.
- Distilled Water: As The Spruce suggests, “Rainwater or distilled water is beneficial for potted plants.” It’s a pure, neutral option that won’t mess with your carefully balanced soil pH.
🌱 Feeding Your Foliage: Fertilization for Robust Growth
A well-fed plant is a happy plant! Tea is a “heavy feeder,” especially during its active growing season (spring and summer). It needs fuel to produce all those delicious leaves.
Nutrient Needs: What Your Tea Plant Craves
You’re growing this plant for its leaves, so you want a fertilizer that promotes lush, green growth. This means one that is high in Nitrogen (N).
- For General Growth: A balanced fertilizer like a 10-10-10 is fine.
- For Maximum Leaf Production: We prefer a fertilizer slightly higher in nitrogen.
- For Flowers: If you’re more interested in the ornamental blooms, The Spruce notes you should “fertilize with higher amounts of phosphorus, such as NPK 5-15-5.” But remember, more energy into flowers means less energy into tea leaves!
Organic vs. Synthetic: Our Expert Recommendations
Here at the farm, we lean heavily organic. Organic fertilizers feed the soil, which in turn feeds the plant, creating a healthier ecosystem.
-
Organic All-Stars (✅):
- Compost: The black gold of the garden. Work it into the soil annually.
- Liquid Fish Emulsion: It stinks to high heaven, but plants LOVE it. A great source of nitrogen. Dilute and apply every 2-3 weeks during the growing season.
- Cottonseed Meal / Holly-tone: These are fantastic granular organic options specifically formulated for acid-loving plants.
-
Synthetic Options (✅, with caution):
- Products like Miracle-Gro Water Soluble Azalea, Camellia, Rhododendron Plant Food work quickly and effectively. However, they can lead to salt buildup in the soil over time, so be sure to flush your pots with plain water occasionally.
When to Feed: Start fertilizing in the spring as new growth appears. Feed every 2-4 weeks through the summer. Stop fertilizing in the fall to allow the plant to prepare for dormancy. Never fertilize a dormant or stressed plant.
👉 Shop Our Favorite Fertilizers:
✂️ The Art of Shaping: Pruning for Health and Harvest
Put down the tiny scissors and grab some real pruners. Pruning is perhaps the most important hands-on task in tea cultivation. An unpruned tea plant will grow into a leggy, 15-foot tree with sparse leaves. A well-pruned plant becomes a dense, productive, waist-high bush.
Why We Prune: Encouraging Bushiness and Yield
Every time you make a cut, the plant responds by sending out multiple new shoots from below that cut. More shoots = more branches = more leaves = more tea! It’s that simple. Pruning also:
- Maintains a manageable size and shape.
- Removes dead, damaged, or diseased wood.
- Improves air circulation, which helps prevent fungal diseases.
- Stimulates the “flush” of new, tender leaves that are best for harvesting.
When and How: Seasonal Pruning Techniques
Pruning isn’t a one-time event; it’s an ongoing conversation with your plant.
- Formative Pruning (Years 1-2): When your young plant is about 2 feet tall, cut it back by about half. Yes, it feels brutal! But this “structural prune” is crucial for establishing a strong, multi-branched frame.
- Annual Pruning (Late Winter/Early Spring): This is your main shaping event. Before new spring growth begins, prune the plant to your desired height (usually 3-4 feet). This is also the time to remove any weak or crossing branches. As The Spruce wisely instructs, “Make the cut just above a leaf node.“
- Harvest Pruning (Throughout the Season): The very act of harvesting—plucking the top “two leaves and a bud”—is a form of light, continuous pruning that keeps the plant productive.
“Plucking Table” Formation: The Grower’s Secret
This is what separates the hobbyist from the pro. The goal of all this pruning is to create a flat, wide, dense surface of leaves at a comfortable height for harvesting. This is called the “plucking table.” By consistently pruning the plant to the same height, you encourage a dense canopy of new growth right where you can easily reach it. This is the secret to maximizing your yield and making harvesting a breeze.
🏡 Potting Up: Container Cultivation for Tea Enthusiasts
No garden? No problem! Camellia sinensis makes a fantastic container plant, allowing anyone, anywhere, to grow their own tea. This is also the best method for growers outside of zones 7-9.
Choosing the Right Pot: Size, Material, and Drainage
The pot is your plant’s universe. Choose wisely.
- Size: Start with a pot that is a few inches wider than the root ball. A common mistake is to put a small plant in a huge pot. This leads to the soil staying wet for too long, causing root rot. Plan to “pot up” every few years.
- Material:
- Terracotta (Clay): ✅ Pros: Porous, allows soil to breathe, prevents overwatering. ❌ Cons: Dries out very quickly in summer, can be heavy.
- Glazed Ceramic/Plastic: ✅ Pros: Retains moisture better, less watering needed. ❌ Cons: Less forgiving of overwatering, so drainage is critical. The Spruce recommends these for their moisture retention.
- Drainage: We’ve said it before, and we’ll say it again. Your pot must have drainage holes. If a decorative pot has no holes, use it as a cachepot (a decorative outer pot) and keep your plant in a plastic nursery pot with drainage inside it.
Repotting Rituals: When and How to Upgrade
Your tea plant will need a bigger home every 2-4 years. You’ll know it’s time when:
- You see roots growing out of the drainage holes.
- The plant dries out extremely quickly.
- Growth seems stunted.
- You can slide the plant out and see a dense web of roots circling the bottom (this is called being “root-bound”).
How to Repot:
- Choose a new pot that is 1-2 inches larger in diameter than the current one.
- Gently remove the plant from its old pot.
- Inspect the roots. If they are tightly wound, gently tease them apart or even make a few vertical cuts with a clean knife to encourage new growth.
- Add a layer of fresh, acidic potting mix to the new pot.
- Place the plant in the center, ensuring the top of the root ball is about an inch below the rim of the new pot.
- Fill in around the sides with more potting mix, and water thoroughly.
❄️ Winter Woes: Protecting Your Tea Plant from the Cold
While some tea varieties are surprisingly tough, they are not invincible arctic explorers. Protecting them from harsh winter weather is key to their long-term survival, especially if you live on the colder edge of their hardiness range.
Hardiness Zones: Knowing Your Limits
The USDA Plant Hardiness Zone Map is your guide.
- Zone 7-9: Your plant can likely stay outdoors year-round with some protection.
- Zone 6: You’re pushing the limits. Choose a cold-hardy cultivar (like some sinensis varieties), plant in a very sheltered location (e.g., against a south-facing wall), and be prepared to provide significant winter protection. Growing in a pot is a safer bet.
- Zone 5 and below: You are officially a container gardener! Your plant must come indoors for the winter.
Indoor Retreats: Overwintering Strategies
For potted plants in cold climates, it’s time for a winter vacation indoors.
- The Location: The goal is to mimic a cool, dormant period, not a tropical vacation. An unheated garage, a cool basement, or an enclosed porch that stays between 45°F and 60°F is perfect.
- The Light: It still needs bright, indirect light. A spot near a window is ideal.
- The Care:
- Water Less: The plant’s growth will slow dramatically. Water only when the soil is dry a few inches down.
- Boost Humidity: Indoor winter air is notoriously dry. A pebble tray or a nearby humidifier can prevent the leaves from getting crispy.
- No Fertilizer: Stop feeding until you see new growth in the spring.
Outdoor Protection: Mulching and Covering
For in-ground plants in zones 6b and 7:
- Mulch Heavily: After the first hard frost, apply a thick (4-6 inch) layer of mulch like shredded leaves or straw around the base of the plant. This insulates the roots.
- Wrap It Up: For extra protection, create a cage of chicken wire around the plant and fill it loosely with straw or shredded leaves. You can also wrap the plant in burlap or a frost cloth during the coldest snaps.
- Remove Protection: In early spring, once the threat of deep freezes has passed, gradually remove the protection to allow the plant to wake up.
🐛 Battling the Blight: Common Pests and Diseases of Tea Plants
The good news? Camellia sinensis is a pretty tough cookie and isn’t plagued by a ton of issues. But, like any plant, it can fall victim to a few uninvited guests. The key is early detection and swift, smart action.
Identifying the Invaders: Aphids, Mites, and More
These are the most common culprits, especially on indoor plants.
- Aphids: Small, pear-shaped insects (often green or black) that cluster on new growth, sucking the life out of your plant. They leave behind a sticky “honeydew.”
- Spider Mites: Tiny arachnids that are hard to see with the naked eye. The tell-tale sign is fine, delicate webbing on the undersides of leaves. They thrive in hot, dry conditions.
- Scale: Bumpy, immobile insects that look like little brown or white shields on the stems and leaves. They are literally armored pests.
- Leafhoppers & Caterpillars: More common on outdoor plants, these guys will chew holes in the leaves.
Fungal Foes: Root Rot and Leaf Spot
Fungal issues are almost always related to too much moisture and not enough air circulation.
- Root Rot: The silent killer we mentioned earlier, caused by waterlogged soil. The plant will look wilted even when the soil is wet. Prevention (good drainage!) is the only real cure.
- Leaf Spot: Fungal or bacterial infections that cause brown or black spots on the leaves.
- Petal Blight: A fungus that turns the beautiful white flowers into a mushy brown mess.
Organic Pest Control: Our Sustainable Solutions
Since you plan to drink the leaves, we strongly advocate for organic, food-safe pest control.
- The First Line of Defense: A strong jet of water from a hose or sprayer can dislodge many pests like aphids and spider mites.
- Insecticidal Soap: A safe, effective option that works by dissolving the outer shell of soft-bodied insects. It must make direct contact to work. Safer Brand Insect Killing Soap is a classic.
- Neem Oil: Our go-to solution. Neem oil is a miracle worker. It acts as an insecticide, a fungicide, and a miticide. It’s also a preventative. We recommend a weekly or bi-weekly spray during the growing season to keep problems at bay. As The Spruce suggests, use it “at the first sign of infestation.”
- Improve Airflow: Prune to open up the plant and ensure good air circulation, which is the best defense against fungal diseases.
🌸 The Elusive Bloom: Encouraging Flowers on Your Tea Plant
Come autumn, you might be treated to a lovely surprise: small, delicate, white flowers with a bright yellow center, smelling faintly of sweet pollen. They’re a beautiful bonus, but their appearance brings up an interesting question for the home tea grower.
Why Flowers Matter (or Don’t) for Tea Production
Here’s the tea: for commercial tea production, flowers are actually undesirable. Flowering is a sign that the plant is shifting its energy from vegetative growth (making leaves) to reproductive growth (making flowers and seeds). For those of us harvesting leaves, this is a bad thing! It means less energy is going into producing the new, tender shoots we want for our tea.
However, for the home grower, the flowers are a delightful ornamental feature. Don’t stress about them; just enjoy the show!
Environmental Triggers for Blooming
So what makes a tea plant decide to bloom?
- Age: A plant typically won’t bloom until it’s at least 3-4 years old.
- Temperature Drop: The primary trigger is the cooling temperatures of autumn. As The Spruce mentions, flower buds start to form “when temperatures drop to around 60°F in autumn.”
- Plant Stress: Sometimes, a stressed plant (e.g., slightly root-bound or underwatered) will flower profusely as a last-ditch effort to reproduce.
- Fertilizer: As we noted earlier, a fertilizer higher in Phosphorus (the ‘P’ in NPK) can encourage more blooms.
If your goal is maximum leaf harvest, you can simply pinch off the flower buds as they form. If you love the look of the flowers, let them be!
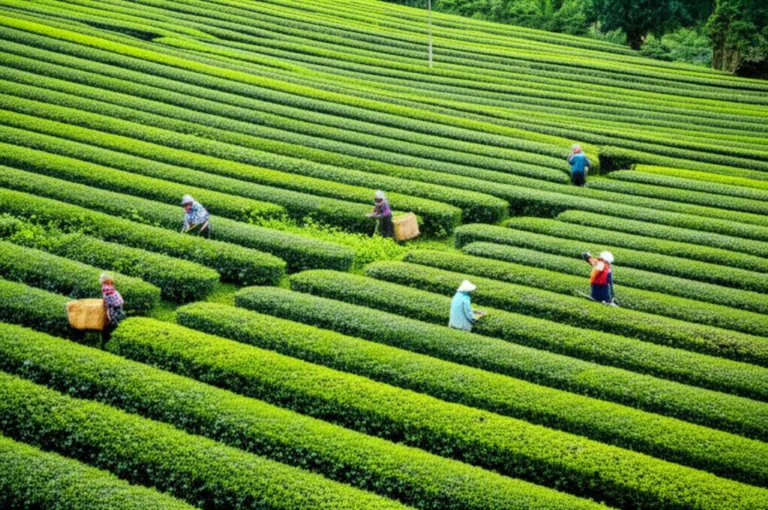
🌿 From Bush to Brew: Harvesting Your Own Tea Leaves
This is the moment you’ve been waiting for! After years of patient care, it’s time to reap your reward. Harvesting your own tea is a simple, meditative process that connects you directly to your cup.
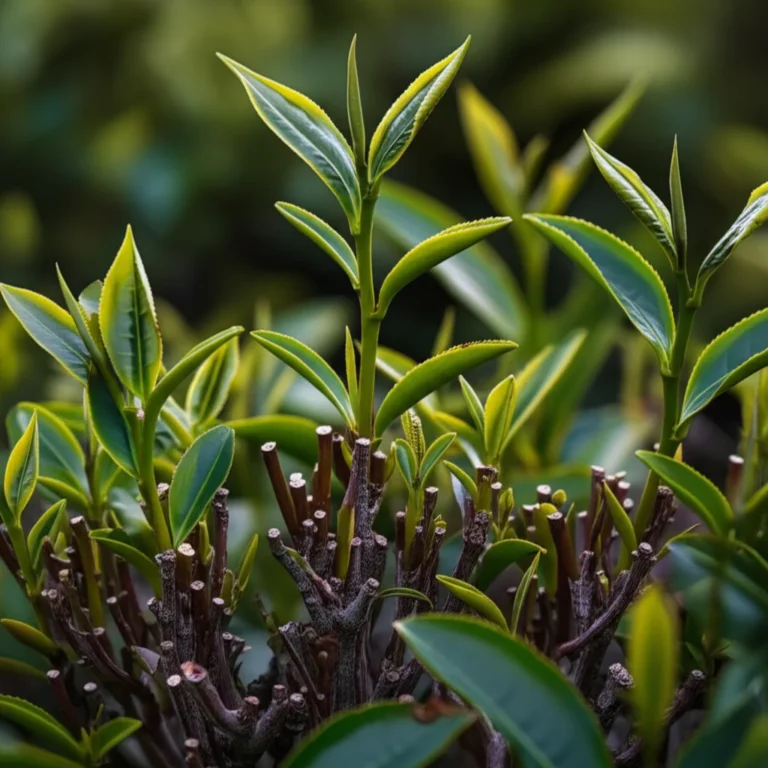
When to Pluck: The “Two Leaves and a Bud” Rule
The highest quality tea is made from the youngest, most tender new growth. This is known as the “flush.”
- The Imperial Pluck: The most prized harvest is just the single, unopened leaf bud at the tip of a branch. This is used for the highest-grade silver needle white teas.
- The Fine Pluck: This is the standard for high-quality tea and what you should aim for. You’ll pluck the terminal bud plus the next two youngest leaves below it. This “two leaves and a bud” combination has the perfect balance of flavor, aroma, and beneficial compounds. You can explore the health benefits of tea to learn more about what makes these leaves so special.
- When to Harvest: You can harvest whenever the plant is actively producing new growth, typically from spring through summer. Harvest in the morning after the dew has dried but before the sun gets too hot. Simply pinch the shoot off with your fingernails.
Processing Basics: A Glimpse into Tea Making
Harvesting is just the first step. The magic of turning one plant into hundreds of different teas happens during processing. This is a huge topic, but here’s a super-quick overview to get you started on your DIY Tea Blending adventure:
- For Green Tea: Quickly heat the leaves after harvesting (by pan-frying or steaming) to prevent oxidation. Then, roll and dry them. This preserves their green color and fresh, vegetal flavors. Our guide to Green Tea Cultivation has more tips.
- For Black Tea: After harvesting, roll or crush the leaves to break down the cell walls. Then, allow them to oxidize in a warm, humid place for several hours. This is where they turn dark and develop their rich, malty flavors. Finally, dry them completely to stop the oxidation.
The journey from bush to brew is a fascinating one, and experimenting with your own small batches is one of the greatest joys of growing your own tea.
❓ Troubleshooting Your Tea Plant: Common Problems and Solutions
Even with the best care, your plant might sometimes look a little… off. Don’t panic! Plants communicate their needs through their leaves. Here’s how to decode their messages.
Yellowing Leaves: Nutrient Deficiencies or Overwatering?
Yellow leaves (chlorosis) are the most common complaint. The pattern of yellowing tells you the story.
- Symptom: Older, lower leaves turn yellow and fall off. The rest of the plant looks okay.
- Likely Cause: This is often a natural process of the plant shedding old leaves. If it’s excessive, it could be a Nitrogen deficiency.
- Solution: Apply a nitrogen-rich fertilizer like fish emulsion.
- Symptom: All-over yellowing, wilted look, and wet soil.
- Likely Cause: Overwatering! The roots are suffocating.
- Solution: Stop watering immediately! Check your drainage. Allow the soil to dry out significantly before watering again.
- Symptom: New leaves are yellow, but the veins remain green.
- Likely Cause: This is classic iron chlorosis, caused by a soil pH that is too high (alkaline). The plant can’t access the iron in the soil.
- Solution: This is a pH problem, not a fertilizer problem. Lower the soil pH with a soil acidifier or by adding peat moss. A foliar spray with chelated iron can provide a quick, temporary fix.
Stunted Growth: What’s Holding Your Plant Back?
If your plant just isn’t growing, it’s time to play detective.
- Check the Roots: Is the plant root-bound in its pot? It may have no room to grow. Solution: Repot into a slightly larger container.
- Check the Soil: Is the pH correct? Is it getting enough nutrients? Solution: Test your soil pH and fertilize regularly during the growing season.
- Check the Light: Is it getting enough sun? A plant in too much shade will not thrive. Solution: Move it to a sunnier location.
Leaf Drop: A Sign of Stress
Sudden leaf drop is your plant’s way of screaming “I’m stressed!” The cause is usually a sudden environmental change.
- Common Triggers:
- Moving the plant from outdoors to indoors (or vice versa).
- A sudden temperature draft (hot or cold).
- Severe over- or underwatering.
- Solution: Identify the stressor and correct it. Provide stable conditions, and be patient. The plant will usually recover and put out new leaves once it has acclimated. Don’t fertilize a stressed plant until it shows signs of recovery.
Conclusion: Your Journey to a Thriving Tea Garden

Congratulations, tea cultivator! You’ve just unlocked the secrets to nurturing your very own Camellia sinensis—the plant that turns soil, sun, and water into the world’s most beloved beverage. From understanding the delicate balance of acidic soil and sunlight to mastering the art of pruning and harvesting, you now hold the keys to a flourishing tea garden.
Remember, growing tea is a marathon, not a sprint. It takes patience, love, and a little bit of green-thumb magic. But the reward? Fresh, homegrown tea leaves that you harvested yourself—there’s nothing quite like it. Whether you’re brewing a delicate green tea or a robust black, your efforts steep into every cup.
If you’ve been wondering about the elusive bloom, now you know: flowers are a charming bonus but not essential for leaf production. And those pesky pests? With organic defenses like neem oil and insecticidal soap, you can keep your tea plant happy and healthy without compromising your harvest.
So, are you ready to start your tea-growing adventure? We say, absolutely yes! Your tea plant is waiting to become the centerpiece of your garden—and your next perfect cup.
Recommended Links: Dive Deeper with Growing Teas™
Ready to gear up? Here are some of our favorite products and resources to help you grow, nurture, and harvest your tea plant like a pro:
-
Espoma Holly-tone Fertilizer:
Amazon | Walmart | Espoma Official Website -
Miracle-Gro Potting Mix for Azalea, Camellia, Rhododendron:
Amazon | Walmart -
Books for Tea Enthusiasts:
The Tea Enthusiast’s Handbook by Mary Lou Heiss & Robert J. Heiss — Amazon
The Story of Tea: A Cultural History and Drinking Guide by Mary Lou Heiss & Robert J. Heiss — Amazon
FAQ: Your Most Pressing Tea Plant Questions Answered

How often should I water my tea plant to ensure optimal growth and health?
Watering your tea plant is a balancing act. The soil should be consistently moist but never soggy. For outdoor plants in well-draining soil, watering deeply once a week is usually sufficient, especially during dry spells. For container plants, you may need to water more frequently—sometimes every 2-3 days during hot weather. Always check the top 1-2 inches of soil; if it feels dry, it’s time to water. Avoid overwatering to prevent root rot, which is the most common cause of tea plant decline.
What type of soil and fertilizers are best suited for tea plants to promote healthy leaves and robust flavor?
Tea plants thrive in acidic, well-draining soil with a pH between 4.5 and 5.5. Amending your soil with peat moss, pine bark, or composted oak leaves helps maintain this acidity. For fertilization, a nitrogen-rich fertilizer encourages lush leaf growth. Organic options like compost, fish emulsion, and Espoma Holly-tone are excellent choices. Fertilize every 2-4 weeks during the growing season and avoid feeding during dormancy. If you want more flowers, use a fertilizer higher in phosphorus, but remember this may reduce leaf production.
How do I prune my tea plant to encourage bushy growth, prevent pests, and increase tea yields?
Pruning is essential for a dense, productive tea bush. Start formative pruning in year one or two by cutting back young plants by half to encourage branching. Annually, prune in late winter or early spring before new growth begins, cutting just above leaf nodes to shape the plant and remove dead or diseased wood. Regular harvesting of the top “two leaves and a bud” also acts as light pruning, stimulating new growth. Pruning improves airflow, which helps prevent fungal diseases and pest infestations.
What are the common pests and diseases that can affect tea plants, and how can I prevent or treat them organically?
Common pests include aphids, spider mites, scale insects, leafhoppers, and caterpillars. Fungal diseases like root rot and leaf spot can also occur, especially in poorly drained soil. Prevention starts with good cultural practices: proper watering, pruning for airflow, and maintaining healthy soil. For organic control, use neem oil, insecticidal soap, and physical removal (like spraying pests off with water). Early detection is key—treat infestations promptly to prevent spread.
How can I encourage my tea plant to bloom, and does flowering affect leaf production?
Tea plants typically bloom starting at 3-4 years old, triggered by cooler autumn temperatures around 60°F. Flowers are small, white, and fragrant but are not necessary for leaf production. In fact, flowering diverts energy away from leaf growth, which is why commercial growers often pinch off flower buds. If you enjoy the ornamental aspect, let your plant bloom; otherwise, pinch buds to focus energy on leaves.
Can I grow tea plants indoors year-round, and what special care do they need?
Yes! Tea plants can be grown indoors, especially in colder climates. They need bright, indirect light, consistent moisture without waterlogging, and higher humidity (use a pebble tray or humidifier). During winter dormancy, reduce watering and stop fertilizing. Indoor plants rarely bloom, but they can thrive and provide fresh leaves for tea. Remember to occasionally move your plant outdoors during the growing season if possible for optimal growth.
Reference Links: Our Trusted Sources
- The Spruce: Camellia sinensis Tea Plant Care Guide
- Minto Island Tea Company: Tea Plants
- PictureThis AI: How to Grow and Care for Tea
- USDA Plant Hardiness Zone Map
- Espoma Organic Fertilizers
- Miracle-Gro Official Site
- TeaClass: Tea Processing Basics
- Growing Teas™: How Hard is Tea to Grow?
- Growing Teas™: Green Tea Cultivation
- Growing Teas™: Health Benefits of Tea
- Growing Teas™: DIY Tea Blending
- Growing Teas™: History of Tea
We hope this guide inspires you to cultivate your own tea garden with confidence and joy. Remember, every great cup starts with a well-loved plant! Cheers to your tea-growing adventure! 🍵🌱