Support our educational content for free when you purchase through links on our site. Learn more
How to Process Tea Leaves After Harvest: 6 Expert Steps 🍃

Imagine plucking fresh, vibrant tea leaves from your own garden and transforming them into a fragrant, flavorful cup of tea—all without leaving your kitchen. Sounds like magic? Well, it’s actually a fascinating blend of tradition, science, and a dash of patience. At Growing Teas™, we’ve spent years perfecting the art of home tea processing, and we’re excited to share our step-by-step guide to help you unlock the full potential of your garden harvest.
Did you know that the same plant, Camellia sinensis, can produce white, green, oolong, or black tea depending solely on how you process the leaves? Later in this article, we’ll reveal how controlling oxidation and rolling techniques can turn your fresh leaves into a variety of teas tailored to your taste. Plus, we’ll share insider tips on harvesting timing, drying methods, and storage secrets that keep your tea fresh for months.
Key Takeaways
- Processing transforms fresh tea leaves into diverse tea types through steps like withering, rolling, oxidation, fixation, and drying.
- Harvest young leaves and buds during spring flush for the best flavor and aroma.
- Oxidation level controls tea type: no oxidation for green and white teas, partial for oolong, full for black.
- Fixation (steaming or pan-firing) halts oxidation to lock in desired flavors.
- Proper drying and airtight storage are essential to preserve freshness and prevent spoilage.
- Brewing your home-processed tea requires precise temperature and timing to avoid bitterness or weak flavor.
Ready to become your own tea master? Let’s dive in!
Table of Contents
- ⚡️ Quick Tips and Facts About Processing Tea Leaves
- 🌱 The Fascinating Journey: From Garden to Cup – Tea Leaf Harvesting and Processing Explained
- 🍃 Types of Tea Leaves and How Their Processing Differs
- 🛠️ Essential Tools and Equipment for Processing Tea Leaves at Home
- ⏰ When and How to Harvest Tea Leaves for Optimal Flavor
- 1️⃣ Step-by-Step Guide: How to Wither Tea Leaves After Harvesting
- 2️⃣ Rolling and Bruising: Unlocking the Tea’s Aroma and Flavor
- 3️⃣ Oxidation Explained: The Magic Behind Tea’s Color and Taste
- 4️⃣ Fixation (Kill-Green): Halting Oxidation at the Perfect Moment
- 5️⃣ Drying Your Tea Leaves: Preserving Freshness and Flavor
- 6️⃣ Sorting and Grading: Preparing Your Tea for Storage or Sale
- 🧊 How to Store Your Homegrown Tea Leaves to Keep Them Fresh
- ☕ Brewing Tips: How to Enjoy Your Home-Processed Tea Like a Pro
- 🌿 Troubleshooting Common Issues in Home Tea Processing
- 📚 Recommended Reading and Resources for Tea Processing Enthusiasts
- 💡 Conclusion: Mastering the Art of Home Tea Leaf Processing
- 🔗 Recommended Links for Tea Growers and Processors
- ❓ Frequently Asked Questions About Processing Tea Leaves
- 📑 Reference Links and Scientific Sources on Tea Processing
Here is the body of the article, written as requested.
⚡️ Quick Tips and Facts About Processing Tea Leaves
Welcome, fellow tea enthusiast! You’ve nurtured your Camellia sinensis plant, and now you’re standing there with a basket of fresh, vibrant leaves, wondering, “What now?” Don’t you worry. We at Growing Teas™ have been there, and we’re here to spill the tea on turning your garden harvest into a glorious cup of homegrown brew. Before we dive deep, here are some fascinating tidbits to get you started:
- One Plant, Many Teas: Believe it or not, all “true” teas—black, green, oolong, and white—come from the very same plant: Camellia sinensis. The magical transformation happens entirely during processing!
- Oxidation is Key: The primary factor that determines the type of tea you create is a process called oxidation. Think of it like a cut apple turning brown; it’s a natural chemical reaction that changes the leaf’s color and flavor profile.
- Patience is a Virtue: Your tea plant will need about 2-3 years to mature before you can get a substantial harvest. It’s a long game, but oh-so-worth-it.
- Freshness First: Always process your tea leaves as soon as possible after harvesting to lock in the best flavors. Leaving them on the stem until you’re ready can help preserve them.
- Don’t Burn Your Brew! The final drying stage is crucial. A common mistake is using an oven that’s too hot, which can scorch the delicate leaves and ruin the flavor. Low and slow is the way to go.
| Tea Factoid 🤓 | The Nitty-Gritty Details |
|---|---|
| Ancient Brew | Tea has been a beloved beverage for over 5,000 years, originating in ancient China. |
| The “Flush” | The most prized leaves for high-quality tea come from the “flush”—the plant’s newest growth, typically the top two leaves and a bud. |
| Caffeine Control | The processing method directly impacts the caffeine level. Generally, the more oxidized the tea, the higher the caffeine content. |
| DIY Flavor | You can create your own unique blends by adding herbs like mint, lemon balm, or even flowers like lavender to your dried tea leaves. Check out our guide to DIY Tea Blending for inspiration! |
🌱 The Fascinating Journey: From Garden to Cup – Tea Leaf Harvesting and Processing Explained
Every time you sip a cup of tea, you’re partaking in a tradition that spans millennia. But have you ever truly considered the incredible journey those leaves took to get to your cup? When you grow your own, you become a part of that ancient story. It’s a transformation that feels like pure alchemy.
Here at the farm, we remember our first successful batch. The air was thick with the scent of freshly rolled leaves—a smell somewhere between cut grass and a floral perfume. That’s the moment you realize you’re not just drying leaves; you’re unlocking a hidden world of aroma and flavor.
The secret, as we mentioned, lies in the processing. By controlling just a few key steps—withering, rolling, oxidizing, and drying—you can take a single batch of leaves from your garden and turn them into a delicate White Tea, a vegetal Green Tea, a complex Oolong, or a robust Black Tea. Each step is a decision that guides the leaves toward their final destiny. It’s this hands-on process that makes homegrown tea a truly personal and rewarding experience, not to mention the amazing Health Benefits of Tea you’ll be enjoying.
🍃 Types of Tea Leaves and How Their Processing Differs
So, how does one plant create such a diverse world of flavors? It all comes down to that one crucial step: oxidation. Let’s break down the four main types of tea you can make at home.
| Tea Type | Oxidation Level | Brewed Color | Caffeine Level (vs. Espresso) | Common Taste Profile |
|---|---|---|---|---|
| White Tea 🤍 | ❌ None | Pale Yellow | ~20% | Light, delicate, sweet, fruity (melon, cucumber) |
| Green Tea 💚 | ❌ None (halted early) | Light Yellow/Green | ~30% | Nutty, savory, vegetal, earthy |
| Oolong Tea 🧡 | ✅ Semi-Oxidized | Rich Amber/Brown | ~50% | Floral, fruity, honey-like, complex |
| Black Tea 🖤 | ✅ Fully Oxidized | Dark Brown | ~60-70% | Bold, strong, malty, astringent, fruity |
Data compiled from various tea resources, including Fast Growing Trees.
As you can see, the more the leaves are allowed to oxidize, the darker and bolder the resulting tea becomes. White and green teas are all about preserving that fresh-from-the-garden character, which is why the oxidation process is skipped or stopped very quickly. Our guide to Green Tea Cultivation can help you grow the perfect leaves for this type. Oolong is the artist’s tea, sitting in a fascinating middle ground with a huge range of flavors depending on how long you let it oxidize. And black tea? It’s the result of letting the leaves undergo a complete transformation.
What about Pu’er tea? While it also comes from Camellia sinensis, it involves a true fermentation process with microbial activity, making it quite tricky (and a bit risky) to replicate safely at home. We recommend sticking to the main four to start!
🛠️ Essential Tools and Equipment for Processing Tea Leaves at Home
You don’t need a factory to process tea, but having the right tools will make your life a whole lot easier. Think of this as your tea-making toolkit. Most of these items you probably already have in your kitchen!
Must-Haves: ✅
- Pruners or Sharp Scissors: For a clean harvest that doesn’t damage the plant. A good pair of Fiskars Pruning Shears is a gardener’s best friend.
- Basket or Bag: To collect your freshly plucked leaves.
- Cheesecloth or Clean Towels: Essential for withering the leaves.
- Baking Tray: A standard Pyrex or Nordic Ware baking sheet is perfect for drying.
- Oven: Your primary tool for fixing and drying the leaves.
- Airtight Container: Crucial for storing your finished tea and keeping it fresh.
Nice-to-Haves: 😉
- Bamboo Rolling Mat: Traditionally used for rolling and shaping leaves, though your hands or a clean countertop work just fine.
- Steamer Basket: For making green tea, this is the ideal way to “fix” the leaves and stop oxidation.
- Food Dehydrator: If you have one, a dehydrator like an Excalibur can provide a more controlled and gentle drying process than an oven.
- Tea Scale: For precise measurements when brewing.
For Storage:
Once your tea is perfectly dried, you need to protect it from its enemies: air, light, moisture, and heat. We recommend opaque, airtight containers.
- Fellow Atmos Vacuum Canister: Amazon | Fellow Official Website
- TeaVac Vitavac Storage Container: Amazon | Walmart
- OXO Pop Containers (Opaque versions): Amazon | Walmart
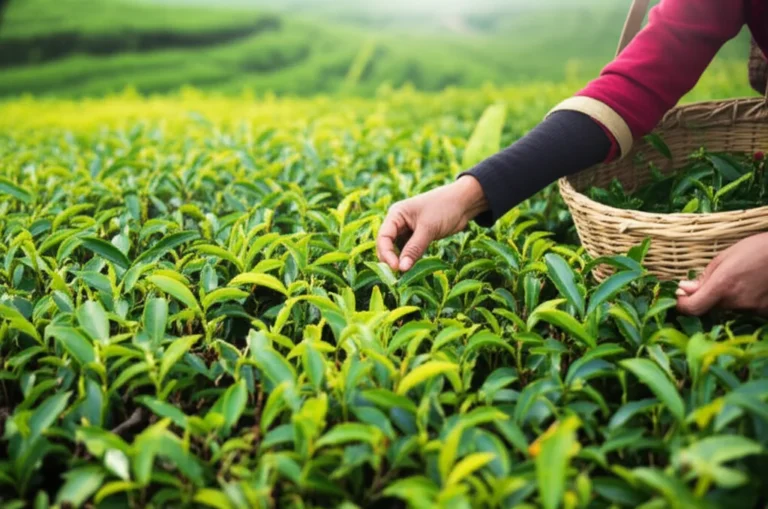
⏰ When and How to Harvest Tea Leaves for Optimal Flavor
Timing is everything! Harvesting at the right moment is the first step to a delicious cup. Get this wrong, and your tea might lack the nuanced flavor you’re hoping for.
When to Harvest
The absolute best time to harvest is in the spring, as the plant puts out its first flush of new growth. These young, tender leaves are packed with the aromatic compounds that make for exceptional tea. In warmer climates, you might get several flushes throughout the growing season.
Look for stems with 2-3 new, bright green leaves and a leaf bud at the tip. This combination is the gold standard for high-quality tea. As the featured video on the ‘Yabukita’ variety explains, pruning after the winter flowering and feeding your plant can encourage this vigorous new growth.
How to Harvest
- Be Gentle: Use your fingers to pinch off the tender new growth right at the stem. You can also use sharp pruners for a cleaner cut.
- Focus on the Flush: Pluck only the youngest, most tender leaves and buds. Older, tougher leaves will result in a harsher, more astringent tea.
- Keep them Fresh: To preserve freshness, some growers prefer to keep the leaves on the small stem sections until they are ready to begin processing.
- Don’t Overdo It: Especially with a young plant, be careful not to harvest too much at once. Leave plenty of foliage on the plant so it can continue to thrive. Adopting good Organic Farming Techniques will ensure your plant stays healthy for years to come.
1️⃣ Step-by-Step Guide: How to Wither Tea Leaves After Harvesting
Withering is the first and arguably one of the most important steps. Its purpose is simple: to reduce the water content in the leaves, making them limp and pliable for rolling. If you skip this, the leaves will just break and crumble when you try to roll them.
Instructions:
- Spread ‘Em Out: Lay your freshly harvested leaves in a thin, even layer on a clean, dry surface. A cheesecloth, a towel, or a bamboo mat on a baking tray works perfectly.
- Find a Good Spot: Place the leaves in a warm, breezy, shaded area. Avoid direct sunlight, except for the specific “solar withering” method used for Oolong tea.
- Patience, Young Grasshopper: Let the leaves sit for several hours (anywhere from 8 to 18 hours, depending on humidity). You’ll need to check on them periodically.
- The “Limp” Test: How do you know they’re ready? The leaves should be noticeably limp and soft, like wilted spinach. They should feel leathery and flexible, and they won’t snap if you fold them.
This is where the house starts to smell amazing. It’s a fresh, green, slightly floral aroma that is the first hint of the deliciousness to come!
2️⃣ Rolling and Bruising: Unlocking the Tea’s Aroma and Flavor
Now for the fun, hands-on part! Rolling is where you physically break down the cell walls within the leaf. This accomplishes two things: it kicks off the oxidation process by mixing enzymes with other compounds, and it brings the flavorful juices to the surface of the leaf.
The Technique:
- Grab a Handful: Take a small bunch of your withered leaves.
- Roll and Press: Roll them gently between your palms or on a clean surface (like a bamboo mat or cutting board). Apply firm but gentle pressure. You want to bruise the leaves, not pulverize them into a pulp.
- Observe the Change: As you roll, you’ll notice the leaves start to darken slightly and release moisture, becoming sticky and incredibly aromatic. This is the magic happening!
- Shape Them (Optional): You can roll the leaves into tight balls or long, twisted shapes. This is mostly for aesthetics, but it can also influence the brew.
For Black Tea, you’ll want to be quite vigorous to bruise the leaves thoroughly. For Oolong and Green Teas, a gentler roll is often preferred. Some sources even say rolling is optional for green tea, but we find it really helps develop the aroma.
3️⃣ Oxidation Explained: The Magic Behind Tea’s Color and Taste
Welcome to the heart of tea processing. Oxidation is the series of chemical reactions that transform the flavor profile of your tea leaves. When you rolled and bruised the leaves, you essentially opened the door for enzymes and oxygen to have a party. The length of this party determines the type of tea you make.
- For Green Tea: You want to stop this party before it even starts. ❌
- For White Tea: The leaves are handled so gently that very minimal, natural oxidation occurs. ❌
- For Oolong Tea: You let the party go for a while, checking on it periodically. The leaves’ edges will start to turn a reddish-brown color. ✅
- For Black Tea: You let the party rage on for hours until the leaves have turned a dark, coppery-brown. ✅
How to Oxidize:
- After rolling, spread the leaves in a layer about 1-2 inches deep on a tray.
- Place them in a cool, humid, and dark room for 2 to 4 hours. A temperature around 70-80°F (21-27°C) is ideal.
- Check the leaves every hour. You will smell the aroma change from grassy to something more floral, fruity, or malty. The color will also deepen.
But how do you STOP this magical process at just the right moment to lock in the flavor you want?
4️⃣ Fixation (Kill-Green): Halting Oxidation at the Perfect Moment
Here’s the answer! To stop oxidation dead in its tracks, you have to apply heat. This step is called fixation, or “kill-green,” because it denatures the enzymes responsible for the browning reaction. This is the critical step for making Green Tea and for stopping the oxidation of Oolong Tea at the desired level.
There are two primary methods:
Steaming (The Japanese Method)
This method preserves the vibrant green color and gives the tea a more vegetal, umami flavor.
- Place your leaves in a steamer basket over boiling water.
- Steam for 1-2 minutes, no longer!
- Immediately remove the leaves and plunge them into an ice water bath or rinse with cold water to stop the cooking process.
Pan-Firing (The Chinese Method)
This gives the tea a toastier, nuttier flavor.
- Heat a dry skillet or wok over medium heat.
- Toss the leaves in the hot pan for 1-2 minutes, stirring constantly to prevent scorching.
- The leaves will wilt and become very fragrant. Remove them from the heat.
A third, more modern method mentioned in the featured video involves microwaving the leaves in a muslin bag for about one minute. This is a quick and effective way to steam-fix the leaves at home!
5️⃣ Drying Your Tea Leaves: Preserving Freshness and Flavor
You’re almost there! The final step is to dry the leaves completely, removing any remaining moisture to make them shelf-stable. Proper drying is essential to prevent mold and preserve the tea’s delicate flavors.
Oven Drying
This is the most common method for home tea makers.
- Preheat your oven to its lowest possible setting, typically between 200-250°F (93-121°C). Some sources suggest 200°F while others say 250°F. We recommend starting lower (200-225°F) to be safe; you can always dry them longer, but you can’t un-burn them!
- Spread your fixed (and possibly re-rolled/shaped) leaves in a single layer on a baking sheet.
- Bake for about 10-20 minutes. It’s crucial to check them every 5 minutes, flipping or stirring them for even drying.
- The tea is done when it is crisp, brittle, and snaps easily. If it bends, it needs more time.
Air Drying
As shown in the video, you can also air-dry your leaves after the fixation and rolling steps. Spread them on a paper-lined tray in a warm, dry place for about a week. This is a more gentle method but requires more time and the right environmental conditions.
6️⃣ Sorting and Grading: Preparing Your Tea for Storage or Sale
This step is for the perfectionists among us (you know who you are!). While not strictly necessary for a delicious homebrew, sorting your finished tea gives it a more polished, professional appearance.
After your tea is fully dried and cooled, simply sift through it and pick out any larger stem pieces or broken, crumbly bits (known as “fannings” or “dust”). In the commercial tea world, teas are meticulously graded by leaf size and quality (think “Orange Pekoe”), but for your own personal stash, a simple visual inspection is all you need.
This final touch is your signature on your creation—a testament to the care you’ve put in from garden to cup.
🧊 How to Store Your Homegrown Tea Leaves to Keep Them Fresh
You’ve done all the hard work; don’t let it go to waste with improper storage! Your beautiful, handcrafted tea is delicate and needs protection from its four mortal enemies: Air, Light, Moisture, and Heat.
Store your tea in an airtight container in a cool, dark, and dry place. A kitchen cabinet or pantry away from the stove or any sunny windows is perfect.
- ✅ Do: Use opaque containers made of ceramic, tin, or dark-colored glass. Vacuum-sealed canisters like the Fellow Atmos are fantastic for preserving freshness.
- ❌ Don’t: Store your tea in a clear glass jar on the countertop. While it might look pretty, light exposure will degrade the flavor of your tea very quickly. Also, avoid storing it in the refrigerator or freezer, as condensation can introduce moisture.
If your tea ever develops a musty smell, changes color, or just tastes “off,” it’s likely past its prime. But if stored correctly, your homegrown tea can stay fresh and delicious for up to a year.
☕ Brewing Tips: How to Enjoy Your Home-Processed Tea Like a Pro
This is the moment of truth—the final reward for all your hard work. Brewing your own tea is a special ritual. Because your tea is whole-leaf, it will behave a bit differently than the crushed tea in store-bought bags.
Here’s a general guide to get the perfect brew. We recommend using about 4-5 whole leaves for an 8 oz cup. Using filtered or distilled water can also make a big difference in flavor!
| Tea Type | Water Temperature | Steeping Time | Pro Tip |
|---|---|---|---|
| White Tea | 160-175°F (70-80°C) | 2-3 minutes | Never use boiling water; it will scorch the delicate leaves. |
| Green Tea | 170-180°F (75-82°C) | 2-3 minutes | Over-steeping will make it bitter. Set a timer! |
| Oolong Tea | 190-205°F (88-96°C) | 3-4 minutes | High-quality oolongs can often be re-steeped multiple times. |
| Black Tea | 200-212°F (93-100°C) | 4-5 minutes | Robust enough to handle boiling water. Great with milk and sugar. |
Data compiled from Fast Growing Trees.
Don’t be afraid to experiment! Your tea is unique. Try a second infusion by adding a minute to the steep time. And for a truly custom cup, consider adding other herbs from your garden like mint, sage, or lavender before you brew. For more ideas, explore our articles on DIY Tea Blending.
🌿 Troubleshooting Common Issues in Home Tea Processing
Even seasoned growers run into hiccups. If your first batch isn’t quite what you expected, don’t despair! Tea making is an art that takes practice. Here are some common problems and how to fix them.
| The Problem 🤔 | The Likely Cause(s) | The Solution ✅ |
|---|---|---|
| My tea tastes bitter or overly “grassy.” | – Water was too hot during brewing. – You over-steeped it. – The “kill-green” step wasn’t hot/long enough. |
– Check your brewing temperature and time. – Ensure you fully heat the leaves during fixation to deactivate all enzymes. |
| My tea smells musty or molded in storage. | – The leaves were not dried completely before storing. – Moisture got into your storage container. |
– Ensure leaves are 100% crisp and brittle before storing. – Use a truly airtight container and keep it in a dry place. Unfortunately, moldy tea must be discarded. |
| My tea has very little flavor. | – The leaves were not rolled/bruised enough. – You under-oxidized it (for oolong/black tea). – You harvested old, tough leaves. |
– Be more vigorous when rolling to release the juices. – Allow more time for oxidation. – Always harvest the youngest, most tender “flush.” |
| I burned my leaves during drying! | – The oven temperature was too high. | – Always use the lowest oven setting and check every 5 minutes. If your oven runs hot, try cracking the door open slightly. |
Remember, every batch is a learning experience. Take notes on what you did, how the tea tastes, and what you might change next time. Soon enough, you’ll be crafting the perfect cup with confidence.
📚 Recommended Reading and Resources for Tea Processing Enthusiasts
If you’ve been bitten by the tea-making bug and want to dive even deeper, we’ve got you covered. Continuing your education is the best way to hone your craft. Here are a few of our favorite resources that we keep on our own shelves here at Growing Teas™.
Books for Your Library:
- The Tea Enthusiast’s Handbook: A Guide to the World’s Best Teas by Mary Lou Heiss and Robert J. Heiss: A fantastic guide to understanding the nuances of different teas from around the world.
- For All the Tea in China: How England Stole the World’s Favorite Drink and Changed History by Sarah Rose: A fascinating historical account that will give you a deep appreciation for the journey of tea.
- Homegrown Tea: An Illustrated Guide to Planting, Harvesting, and Blending Teas and Tisanes by Cassie L. Liversedge: A practical and beautiful guide specifically for the home grower.
Online Communities & Resources:
- Steepster: A massive online community for tea lovers to post reviews and notes on thousands of teas. A great place to learn about flavor profiles.
- Teadb.org: An incredible resource with detailed information on tea cultivars, processing methods, and more. For the true tea geek!
- r/tea on Reddit: A vibrant community for asking questions, sharing photos of your homegrown tea, and connecting with other enthusiasts.
💡 Conclusion: Mastering the Art of Home Tea Leaf Processing
Congratulations! You’ve journeyed from freshly plucked tea leaves in your garden to the brink of sipping your very own handcrafted brew. Processing tea leaves at home is a rewarding blend of science, art, and a little bit of patience. From withering to rolling, oxidation to fixation, and finally drying and storing—each step shapes the character and flavor of your tea.
Remember the big reveal: all teas come from the same plant, Camellia sinensis, and it’s the processing that creates the magic. Whether you prefer the delicate sweetness of white tea or the bold robustness of black tea, the power is in your hands.
If you ever found yourself wondering, “How do I know when to stop oxidation?” or “What’s the best way to dry my leaves without burning them?” — now you have the answers. The key is to observe your leaves closely, trust your senses, and embrace experimentation. Each batch will teach you something new.
We highly recommend starting with green or oolong teas if you’re new to processing, as they offer a forgiving middle ground between the extremes of white and black teas. And don’t forget: proper storage is your best friend for preserving freshness and flavor.
Your homegrown tea is more than a beverage—it’s a story of your care, your garden, and your craftsmanship. So brew that perfect cup, share it with friends, and savor the fruits of your labor. Cheers to your tea-growing adventure! 🍵
🔗 Recommended Links for Tea Growers and Processors
Ready to gear up for your tea processing journey? Here are some trusted products and resources we love and recommend:
- Fiskars Pruning Shears:
Amazon | Walmart - Pyrex Baking Tray:
Amazon | Walmart - Fellow Atmos Vacuum Canister (Tea Storage):
Amazon | Fellow Official Website - Excalibur Food Dehydrator:
Amazon - TeaVac Vitavac Storage Container:
Amazon | Walmart
Books to Deepen Your Tea Knowledge:
- The Tea Enthusiast’s Handbook by Mary Lou Heiss & Robert J. Heiss
Amazon - For All the Tea in China by Sarah Rose
Amazon - Homegrown Tea by Cassie L. Liversedge
Amazon
❓ Frequently Asked Questions About Processing Tea Leaves
What are some common mistakes to avoid when harvesting and processing tea leaves to ensure high-quality tea?
Common pitfalls include:
- Harvesting old or damaged leaves: Always pick the youngest flush—two leaves and a bud—for the best flavor.
- Delaying processing: Freshly picked leaves should be processed promptly to prevent spoilage and loss of aroma.
- Skipping withering or improper withering: Leaves that are too wet or too dry will not roll or oxidize properly.
- Over-oxidizing or under-oxidizing: Timing oxidation is crucial; too long leads to bitterness, too short results in flat flavor.
- Burning leaves during drying: Use low oven temperatures and check frequently to avoid scorching.
Avoiding these will set you on the path to success!
Can I use fresh tea leaves immediately after harvesting, or do they need to be processed first?
Fresh tea leaves should not be brewed immediately like fresh herbs. They contain high moisture and active enzymes that need to be processed—withered, rolled, oxidized (depending on tea type), and dried—to develop flavor and preserve the leaves. Brewing fresh leaves will result in a weak, grassy infusion.
How do I store tea leaves to maintain their freshness and prevent spoilage?
Store tea leaves in airtight, opaque containers away from heat, moisture, air, and light. Keep them in a cool, dry place like a pantry or cupboard. Avoid refrigeration or freezing, as condensation can cause mold. Properly stored tea can last up to a year while preserving flavor.
What equipment do I need to process and brew tea leaves at home?
At minimum, you’ll need:
- Pruning shears or scissors for harvesting
- A clean surface or trays for withering
- Rolling tools (your hands work great!)
- Oven or steamer for fixation and drying
- Airtight containers for storage
- A kettle and teapot or infuser for brewing
Optional but helpful: food dehydrator, bamboo rolling mats, tea scale.
What are the different types of tea that I can grow in my garden, and how do I care for them?
You can grow the Camellia sinensis plant, which produces all traditional teas: white, green, oolong, and black. Care involves:
- Planting in acidic, well-drained soil
- Providing partial shade and protection from harsh winds
- Regular watering but avoiding waterlogging
- Pruning to encourage new flushes
- Using organic farming techniques to maintain plant health
For detailed care, see our Green Tea Cultivation and Organic Farming Techniques guides.
How do I know when my tea leaves are ready to be harvested for optimal taste and quality?
Harvest when the new growth flush has 2-3 bright green leaves and a bud. The leaves should be tender and vibrant. Harvesting too early or too late affects flavor and yield. Spring is the prime harvest season, but in warm climates, multiple flushes may occur.
What is the ideal time of day and weather conditions for harvesting tea leaves to get the best flavor?
Harvest on a dry, sunny morning after the dew has evaporated but before the heat of the day. Moisture on leaves can cause mold during processing, and heat can cause the leaves to wilt prematurely.
How can I prevent common pests and diseases from affecting my tea plants and reducing my yield?
Use organic pest control methods such as:
- Encouraging beneficial insects (ladybugs, lacewings)
- Applying neem oil or insecticidal soaps
- Practicing good sanitation by removing fallen leaves
- Ensuring proper spacing and airflow to reduce fungal diseases
Refer to our Organic Farming Techniques for comprehensive advice.
What are the best methods for drying tea leaves to preserve their flavor and aroma?
Low-temperature oven drying (200-225°F) with frequent stirring is most accessible for home growers. Alternatively, a food dehydrator offers gentle, even drying. Air drying is possible but requires dry, warm conditions and patience. Avoid high heat to prevent burning and flavor loss.
📑 Reference Links and Scientific Sources on Tea Processing
- Fast Growing Trees: How to Harvest Your Own Tea
- The Spruce Eats: Growing Tea at Home
- Fusion Teas Blog: How Tea Leaves Are Harvested and Processed
- Fellow Products: Fellow Atmos Vacuum Canister
- Excalibur Dehydrators: Official Website
- Fiskars: Official Website
For more on tea cultivation and processing, visit our Growing Teas™ website.
We hope this comprehensive guide empowers you to turn your garden harvest into a delicious cup of tea that you can truly call your own. Happy brewing! 🍃🍵