Support our educational content for free when you purchase through links on our site. Learn more
🍃 How to Process Tea Leaves: 10 Steps to Garden Brew (2026)
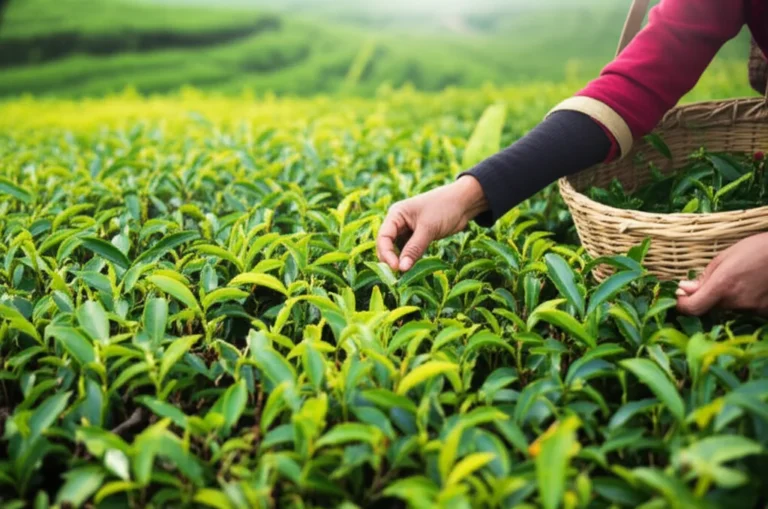
You’ve done the hard part: you’ve nurtured your Camellia sinensis plants, watched them flourish, and finally plucked those precious “two leaves and a bud.” But now you’re staring at a bowl of fresh green foliage, wondering, “Do I just boil these?” If you toss them straight into hot water, you’ll get a grassy, astringent mess that tastes more like a lawn than a luxury beverage. The secret to transforming your garden harvest into a cup of liquid gold lies entirely in the processing.
At Growing Teas™, we’ve turned countless batches of backyard leaves into everything from delicate, grassy greens to rich, malty blacks. It all comes down to mastering the delicate dance of withering, rolling, oxidizing, and firing. Did you know that the difference between a green tea and a black tea isn’t the plant, but how long you let the leaves “breathe” before drying them? In this guide, we’ll walk you through the exact 10-step method we use to turn your harvest into a world-class brew, including troubleshooting tips for when your tea tastes too bitter or smells musty.
Key Takeaways
- Processing is Non-Negotiable: Fresh tea leaves must be processed (withered, rolled, oxidized, and dried) to develop flavor; brewing them raw results in a bitter, grassy taste.
- Oxidation Defines the Type: The level of oxidation you control determines whether you create Green (0%), White (5-10%), Oolong (10-70%), or Black (80-10%) tea.
- Moisture is the Enemy: Ensuring leaves are bone dry before storage is critical to prevent mold and preserve freshness for months.
- Simple Tools Work Best: You don’t need industrial machinery; a dehydrator, baking sheets, and a cast iron skillet are often all you need to start.
- Timing Matters: Harvest in the mid-morning after dew evaporates for the highest concentration of essential oils.
Table of Contents
- ⚡️ Quick Tips and Facts
- 🌱 From Bud to Brew: A Brief History of Tea Leaf Processing
- 1. The Critical First Step: Withering Your Freshly Picked Leaves
- 2. Rolling and Bruising: How to Release Essential Oils and Enzymes
- 3. Oxidation Control: Mastering the Art of Fermentation for Black, Oolong, and Green Tea
- 4. Drying and Firing: Locking in Flavor and Stopping the Process
- 5. Sorting and Grading: Separating the Dust from the Darjeling
- 6. Crafting Specific Varieties: Step-by-Step Guides for Green, Black, White, Oolong, and Pu-erh
- 7. Troubleshooting Common Home Processing Mistakes
- 8. Essential Tools and Equipment for the Backyard Tea Processor
- 9. Storage Secrets: How to Keep Your Homemade Tea Fresh for Months
- 10. Brewing Your Harvest: Tips for the Perfect Cup of Home-Grown Tea
- 🏆 Conclusion
- 🔗 Recommended Links
- ❓ FAQ: Your Burning Questions About Processing Tea Leaves Answered
- 📚 Reference Links
⚡️ Quick Tips and Facts
Before we dive into the nitty-gritty of turning your garden’s green gold into a steaming cup of joy, let’s hit the fast track. If you’re reading this while holding a handful of freshly plucked Camellia sinensis leaves, you’re probably wondering if you can just toss them in hot water right now. Spoiler alert: You can, but it won’t taste like the tea you know and love. It’ll taste like… well, a wet leaf. 🍃
Here is the cheat sheet to get you started without ruining your harvest:
- The Golden Rule: Never wash your tea leaves before processing unless they are visibly covered in dirt or bugs. Water is the enemy of drying; it invites mold and dilutes flavor. If they are dirty, rinse them quickly and pat them bone dry immediately, but ideally, just pick clean leaves.
- Timing is Everything: The best time to harvest is mid-morning, after the dew has evaporated but before the miday sun wilts the leaves. This is when the essential oils are most concentrated.
- The “Snap” Test: Your leaves are ready for processing when the stem snaps cleanly rather than bending. If it bends, it’s too young; if it crumbles, it’s too old.
- Green vs. Black: The difference between green and black tea isn’t the plant; it’s the oxidation process. We’ll get to that in a minute!
- Don’t Panic: If you mess up the first batch, you haven’t ruined the plant. You’ve just made a very interesting experiment. We’ve all been there!
For more on how to get your plants to that perfect harvest stage, check out our guide on Growing Teas.
🌱 From Bud to Brew: A Brief History of Tea Leaf Processing

You might think processing tea is a modern invention, but humans have been messing with leaves for over 5,0 years. Legend has it that the Chinese Emperor Shen Nung discovered tea in 2737 BC when leaves from a wild bush blew into his pot of boiling water. He didn’t just drink it; he processed it by accident, and the rest is history.
Originally, tea was processed as a compressed cake for transport and trade along the Silk Road. It wasn’t until the Song Dynasty (960–1279 AD) that loose-leaf tea became popular, and the methods we use today (withering, rolling, oxidizing, firing) were refined.
Why Processing Matters
If you skip processing, you get a grassy, astringent mess. Processing does three critical things:
- Stops Enzymatic Activity: For green tea, we kill the enzymes immediately to keep it green.
- Releases Oils: Rolling breaks cell walls to release the aromatic compounds.
- Develops Flavor: Oxidation (often called fermentation in the tea world) turns those green leaves into the rich, malty flavors of black tea or the floral notes of olong.
As noted by experts at the University of California, Davis, the chemical transformation of polyphenols during oxidation is what defines the tea type. Without this step, you’re just drinking boiled grass!
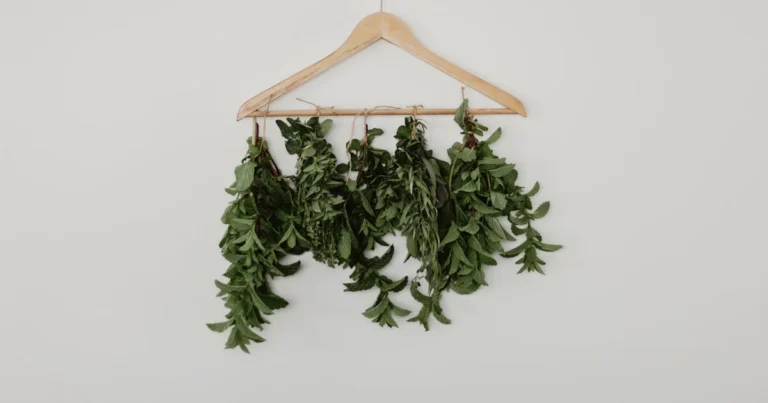
1. The Critical First Step: Withering Your Freshly Picked Leaves
Imagine your tea leaves are like a sponge soaked in water. They are heavy, limp, and full of moisture. If you try to roll them now, they’ll just turn into a green mush. Withering is the process of letting that moisture evaporate so the leaves become pliable and ready for the next stage.
How to Wither Like a Pro
You have two main options here: Air Withering (traditional) or Heat Withering (modern/faster).
Air Withering (The Gentle Approach)
This is the method used for high-quality olongs and some black teas.
- The Setup: Spread your leaves in a single layer on clean muslin cloths, bamboo trays, or even clean baking sheets.
- The Environment: You need good airflow but no direct sunlight. Direct sun will cook the leaves unevenly and ruin the flavor.
- The Duration: This can take anywhere from 12 to 24 hours, depending on humidity.
- The Goal: The leaves should lose about 30-40% of their moisture. They should feel soft and leathery, like a fresh ear of corn husk, and the midrib (the stem in the middle of the leaf) should bend without snapping.
Heat Withering (The Speed Run)
If you live in a humid climate or just want to get this done, you can use a dehydrator or an oven.
- Temperature: Keep it low! 95°F to 10°F (35°C – 43°C) is the sweet spot. Anything hotter will start cooking the leaves prematurely.
- Time: Usually 2 to 4 hours.
- Pro Tip: If using an oven, prop the door open slightly to let moisture escape.
⚠️ Warning: Don’t over-wither! If the leaves become brittle and crumble, you’ve gone too far. You can’t un-wither a leaf.
Visualizing the Wither
| State | Texture | Moisture Loss | Readiness |
|---|---|---|---|
| Fresh | Crisp, snaps easily | 0% | Not ready |
| Withered | Soft, leathery, bends | 30-40% | Ready to Roll |
| Over-withered | Britle, crumbles | >50% | Ruined for rolling |
2. Rolling and Bruising: How to Release Essential Oils and Enzymes
Now that your leaves are soft, it’s time to get physical. Rolling isn’t just about shaping the leaf; it’s about breaking the cell walls. Inside every tea leaf are tiny sacs filled with enzymes and essential oils. When you crush the cells, these compounds mix with oxygen, starting the oxidation process (for black/oolong tea) or releasing the aroma (for green tea).
The Art of the Roll
You don’t need a fancy machine (though they exist). You can do this by hand!
- The Hand Roll: Take a handful of withered leaves. Place them on a clean surface. Gently roll them between your palms in a circular motion. Imagine you are trying to roll a tiny ball of dough. Do this for about 10-15 minutes.
- The Board Roll: Place leaves on a wooden board. Use a rolling pin (lightly!) or a clean bottle to gently press and twist the leaves.
- The “Tea Ball” Method: Some traditional methods involve rolling the leaves into a tight ball and then unrolling them. This creates the twisted shape of many black teas.
What to look for: The leaves should turn from a pale green to a darker, olive green. They should feel sticky and release a strong, grassy, or floral scent. This is the smell of success!
Fun Fact: The degree of rolling determines the shape of your final tea. Light rolling = loose leaf. Heavy rolling = tight pellets or “gunpowder” style tea.
If you want to see this in action, check out this featured video where a grower demonstrates the hand-rolling technique on Camellia sinensis ‘Yabukita’.
3. Oxidation Control: Mastering the Art of Fermentation for Black, Oolong, and Green Tea
Here is where the magic happens. Oxidation (often mislabeled as fermentation) is the chemical reaction that turns green leaves into black, olong, or white tea. It’s the difference between a fresh apple slice and a brown, mushy one—except in tea, the “brown” is delicious!
The Oxidation Spectrum
- Green Tea (0% Oxidation): We stop the process immediately. The leaves stay green and grassy.
- White Tea (5-10% Oxidation): Minimal processing. Leaves are just withered and dried.
- Oolong Tea (10-70% Oxidation): A partial oxidation. This creates complex floral and fruity notes.
- Black Tea (80-10% Oxidation): Full oxidation. The leaves turn dark brown/black, developing malty, sweet, or spicy flavors.
How to Control It
For Green Tea:
You must kill the enzymes (a process called “fixation” or “kill-green”) immediately after rolling.
- Method: Pan-frying in a hot skillet (like a wok) or steaming.
- Time: 2-3 minutes in a hot pan until the leaves smell like roasted vegetables and lose their raw grassy smell.
For Black Tea:
You want to let the leaves sit and breathe.
- Method: Spread the rolled leaves in a thin layer on a tray. Cover them with a damp cloth to keep humidity high.
- Environment: Warm (70°F – 80°F / 21°C – 27°C) and humid.
- Time: 2 to 4 hours. Watch the color change! When the leaves turn a deep coppery-brown and smell sweet/fruity, they are done.
For Oolong Tea:
This is the tricky one. It involves a cycle of withering, bruising, and resting.
- Method: Shake the leaves in a basket to bruise the edges, then let them rest. Repeat this 3-4 times.
- Result: The edges oxidize (turn brown) while the center stays green, creating that unique flavor profile.
❓ Curiosity Check: Why do some home-brewed black teas taste so bitter? It’s often because the oxidation wasn’t stopped at the right time, or the leaves were over-oxidized, turning the delicate flavors into harsh tannins. We’ll fix this in the drying section!
4. Drying and Firing: Locking in Flavor and Stopping the Process
You’ve rolled, you’ve oxidized (or not), and now you have a tray of beautiful, aromatic leaves. But they are still wet! If you don’t dry them now, they will mold within days. Drying (or firing) stops the enzymatic activity permanently and locks in the flavor.
The Drying Methods
- Oven Drying:
- Set your oven to the lowest setting (usually 170°F – 20°F / 75°C – 95°C).
- Spread leaves on a baking sheet lined with parchment paper.
- Leave the door slightly ajar to let moisture escape.
Time: 20-40 minutes. Check every 10 minutes!
- Dehydrator:
- Set to 95°F – 10°F (35°C – 43°C).
Time: 4-6 hours.
Tip: Rotate trays every hour for even drying.
- Air Drying (Sun or Shade):
- Only for green tea or white tea where you want a very slow dry.
Caution: In humid climates, this is risky. Mold is the enemy!
How to Know It’s Done
The leaves must be bone dry.
- The Test: Take a leaf and try to crush it. If it crumbles into dust, it’s done. If it bends or feels leathery, it needs more time.
- The Sound: Dry leaves should make a distinct “crackling” sound when you move them in the tray.
⚠️ Critical Step: If you stop drying too early, the tea will develop a musty, moldy taste. If you over-dry, the flavor becomes flat and lifeless. Trust your senses!
5. Sorting and Grading: Separating the Dust from the Darjeling
You’ve done the hard work. Now, you have a mix of whole leaves, broken pieces, and some dust. In the commercial world, this is where “grading” happens (OP, BOP, Fannings, etc.). At home, we just want to separate the good stuff from the crumbs.
The Sorting Process
-
Sifting: Use a kitchen sieve or a mesh strainer.
Large Leaves: These are your premium “whole leaf” tea.
Broken Leaves: These brew faster and are great for daily drinking.
Dust: Don’t throw it away! Use it for tea bags or quick infusions. -
Visual Inspection: Pick out any stems or discolored leaves. While stems can add sweetness (like in Japanese Bancha), too many can make the tea bitter.
Why Grading Matters
- Brewing Time: Whole leaves take longer to steep (3-5 mins). Broken leaves and dust brew quickly (1-2 mins).
- Flavor Profile: Whole leaves release flavor slowly, offering a complex, layered taste. Broken leaves release flavor fast, often resulting in a stronger, more astringent cup.
6. Crafting Specific Varieties: Step-by-Step Guides for Green, Black, White, Oolong, and Pu-erh
Ready to make a specific type? Here is your roadmap.
🍵 Green Tea (The “No-Oxidation” Route)
- Harvest: Young tips (2 leaves + 1 bud).
- Wither: Light wither (1-2 hours) or skip if leaves are very fresh.
- Fixation (Kill-Green): Pan-fry or steam immediately to stop oxidation.
- Roll: Gently roll to shape.
- Dry: Dry thoroughly.
- Flavor: Grassy, vegetal, fresh.
☕ Black Tea (The “Full Oxidation” Route)
- Harvest: Mature leaves (2 leaves + 1 bud).
- Wither: Heavy wither (12-18 hours) until soft.
- Roll: Vigorously roll to break cells.
- Oxidize: Keep warm and humid for 2-4 hours until coppery brown.
- Dry: High heat to stop oxidation.
- Flavor: Malty, sweet, robust.
🌸 Oolong Tea (The “Partial Oxidation” Route)
- Harvest: Mature leaves.
- Wither: Sun wither or air wither.
- Bruise: Shake in a basket to bruise edges.
- Rest: Let sit until edges turn brown (10-30% oxidation).
- Kill-Green: Heat to stop oxidation.
- Roll: Roll into tight balls or strips.
- Dry: Low and slow.
- Flavor: Floral, fruity, complex.
🤍 White Tea (The “Minimalist” Route)
- Harvest: Very young buds and leaves.
- Wither: Long wither (24-48 hours) in a cool, dry place.
- Dry: Gentle drying. No rolling, no oxidation.
- Flavor: Delicate, sweet, subtle.
🍂 Pu-erh (The “Aged” Route)
- Note: This is advanced! It involves a post-fermentation process where the tea is piled and allowed to ferment with microbes over months or years. For beginners, stick to the first four types!
7. Troubleshooting Common Home Processing Mistakes
Even the best tea growers make mistakes. Here is how to fix them.
| Problem | Likely Cause | The Fix |
|---|---|---|
| Tea tastes grassy/raw | Under-oxidized (for black tea) or under-fixed (for green tea) | Extend oxidation time or increase heat during fixation. |
| Tea tastes bitter/astringent | Over-oxidized or over-steped | Reduce oxidation time; brew with cooler water. |
| Tea smells musty/moldy | Not dried enough or dried too slowly | Ensure leaves are bone dry; use a dehydrator in humid climates. |
| Tea has no flavor | Over-withered or old leaves | Harvest fresher leaves; reduce withering time. |
| Leaves turn black too fast | Too much heat during withering | Lower the temperature; increase airflow. |
💡 Pro Tip: If your tea tastes bitter, try brewing it with water that is slightly cooler (175°F for green, 195°F for black). Temperature matters as much as processing!
8. Essential Tools and Equipment for the Backyard Tea Processor
You don’t need a factory to make great tea. Here is the starter kit for your kitchen.
The Basics
- Clean Baking Sheets: For withering and drying.
- Muslin Cloths or Chesecloth: For wrapping leaves during rolling or covering during oxidation.
- Kitchen Scale: To measure your harvest accurately.
- Thermometer: Crucial for monitoring oven/dehydrator temps.
The Upgrades
- Food Dehydrator: The Excalibur 9-Tray Dehydrator is a favorite among home tea growers for its even airflow.
- Wok or Cast Iron Skillet: For pan-frying green tea.
- Bamboo Trays: Traditional and great for airflow.
👉 CHECK PRICE on:
- Excalibur Dehydrator: Amazon | Walmart | Excalibur Official
- Cast Iron Wok: Amazon | Lodge Cast Iron Official
9. Storage Secrets: How to Keep Your Homemade Tea Fresh for Months
You’ve made the tea. Now, how do you keep it from turning into dust? Tea is hygroscopic, meaning it absorbs moisture and odors from the air.
The Golden Rules of Storage
- Airtight is Right: Use glass jars with rubber seals or high-quality Mylar bags.
- Darkness is Key: Light degrades tea. Store in a cupboard or use opaque containers.
- Cool and Dry: Avoid the stove or fridge (fridges are humid!). A cool pantry is best.
- Whole Leaf: Keep leaves whole until you are ready to brew. Grinding them exposes more surface area to air, speeding up staling.
Shelf Life
- Green Tea: 6-12 months (best consumed fresh).
- Black Tea: 1-2 years.
- Oolong: 1-2 years (some can age longer).
- White Tea: Can age for years, developing a mellower flavor.
❓ Question: Can I freeze my tea?
Answer: Yes, but only if it’s completely dry and sealed in an airtight bag. Thaw it slowly in the fridge before opening to prevent condensation.
10. Brewing Your Harvest: Tips for the Perfect Cup of Home-Grown Tea
The moment of truth! You’ve grown, harvested, processed, and stored your tea. Now, let’s brew it.
The Perfect Brew
- Water Quality: Use filtered water. Tap water with chlorine will ruin your hard work.
- Temperature:
Green Tea: 175°F – 185°F (80°C – 85°C). Boiling water burns green tea!
Black Tea: 20°F – 212°F (95°C – 10°C).
Oolong: 190°F – 20°F (8°C – 93°C). - Time:
Green: 2-3 minutes.
Black: 3-5 minutes.
Oolong: 3-5 minutes (can be steeped multiple times!). - Ratio: 1 teaspoon of loose leaf per 8 oz of water. Adjust to taste!
Blending Fun
Don’t be afraid to mix your homemade tea with herbs! Try adding a pinch of dried Lemon Balm or Mint to your green tea for a refreshing twist. Check out our DIY Tea Blending guide for more ideas.
Final Thought: The best tea is the one you made yourself. It connects you to the earth, the seasons, and the ancient art of tea. So, grab your mug, take a deep breath, and enjoy the fruits (or leaves) of your labor!
🏆 Conclusion

Processing tea leaves from your garden is a journey that transforms simple green foliage into a complex, aromatic beverage. From the delicate art of withering to the precise control of oxidation, every step shapes the final flavor. While it may seem daunting at first, remember that even the masters started with a single leaf.
Key Takeaways:
- Don’t wash your leaves before processing.
- Control moisture carefully during withering and drying.
- Oxidation is the secret sauce that defines your tea type.
- Storage is just as important as processing to maintain freshness.
Whether you are crafting a delicate green tea or a robust black tea, the satisfaction of sipping a cup made entirely from your own garden is unmatched. So, what are you waiting for? Get those leaves rolling!
🔗 Recommended Links
Ready to take your tea game to the next level? Here are some essential resources and products:
- Books:
- The Story of Tea: A Cultural History and Drinking Guide by Betty J. Jackson
- Tea: History, Teroirs, Varieties by Catherine Donelly
- Equipment:
Dehydrator: Excalibur 9-Tray Dehydrator
Cast Iron Wok: Lodge Cast Iron Wok
Tea Storage Jars: Airlock Tea Canisters - Growing Supplies:
Camellia sinensis Plants: Growing Teas Shop
Organic Fertilizer: Dr. Earth Organic Tea Fertilizer
❓ FAQ: Your Burning Questions About Processing Tea Leaves Answered

What are some common mistakes to avoid when harvesting and processing tea leaves to ensure high-quality tea?
The most common mistake is washing the leaves before processing, which introduces moisture and leads to mold. Another is over-oxidizing black tea, resulting in a bitter taste, or under-fixing green tea, leaving it grassy. Always ensure leaves are bone dry before storage to prevent spoilage.
Read more about “How to Process Tea Leaves After Harvest: 6 Expert Steps 🍃”
Can I use fresh tea leaves immediately after harvesting, or do they need to be processed first?
You can use fresh leaves immediately, but the flavor will be astringent and grassy. Processing (withering, oxidizing, drying) is essential to develop the complex flavors and aromas associated with tea. Fresh leaves are best used for a quick “green tea” experiment, but for a true tea experience, processing is a must.
How do I store tea leaves to maintain their freshness and prevent spoilage?
Store your dried tea in airtight, opaque containers in a cool, dark, and dry place. Avoid the refrigerator unless the tea is vacuum-sealed, as humidity can ruin the flavor. Keep leaves whole until brewing to preserve freshness.
What equipment do I need to process and brew tea leaves at home?
You don’t need much! A baking sheet, muslin cloth, oven or dehydrator, and a kitchen scale are sufficient. For green tea, a wok or cast iron skillet is useful for fixation. For brewing, a kettle with temperature control and a tea infuser are recommended.
Read more about “🌿 12 Seasonal Care Tips for Thriving Tea Plants (2026)”
What are the different types of tea that I can grow in my garden, and how do I care for them?
You can grow Camellia sinensis for green, black, olong, and white tea. For herbal teas, consider Lemon Balm, Mint, Chamomile, and Raspberry Leaf. Tea plants prefer acidic soil, partial shade, and regular watering. Check our Green Tea Cultivation and Herbal Tea Planting guides for specific care tips.
How do I know when my tea leaves are ready to be harvested for optimal taste and quality?
Harvest when the leaves are young and tender, typically the “two leaves and a bud” stage. The stem should snap cleanly rather than bend. Harvest in the mid-morning after the dew has dried but before the heat of the day.
Can I use fresh tea leaves to make tea, or do they need to be processed and dried first?
Fresh leaves can be steeped, but they will lack the depth of flavor and may taste bitter. Processing and drying are crucial for developing the characteristic flavors of tea. If you must use fresh leaves, steep them for a shorter time (1-2 minutes) to reduce astringency.
What is the ideal time of day and weather conditions for harvesting tea leaves to get the best flavor?
The ideal time is mid-morning on a dry, sunny day. Avoid harvesting after rain or in the early morning when dew is present, as excess moisture can affect the processing. Leaves harvested before a rain event often have a more intense flavor.
How can I prevent common pests and diseases from affecting my tea plants and reducing my yield?
Maintain good air circulation around your plants to prevent fungal diseases. Use organic pest control methods like neem oil or insecticidal soap for aphids and spider mites. Regularly inspect your plants and remove any diseased leaves immediately.
What are the best methods for drying tea leaves to preserve their flavor and aroma?
Dehydrators are excellent for consistent results, especially in humid climates. Oven drying at low temperatures (170°F – 20°F) works well for small batches. Air drying is traditional but requires careful monitoring to prevent mold. The key is to dry the leaves until they are bone dry and crumble easily.
📚 Reference Links
- University of California, Davis – Tea Chemistry
- Daily Harvest Designs – Raspberry Leaf Tea Guide
- Forks in the Dirt – Harvesting and Preserving Herbs
- Eco Farming Daily – Growing and Using Lemon Balm
- Growing Teas – Green Tea Cultivation
- Growing Teas – Herbal Tea Planting
- Growing Teas – Organic Farming Techniques
- Growing Teas – Health Benefits of Tea
- Growing Teas – DIY Tea Blending