Support our educational content for free when you purchase through links on our site. Learn more
🌱 How Long Do Peas Grow From Seed? (2026 Timeline)
Ever wonder why your garden peas seem to vanish before you can even pick them, or worse, never sprout at all? At Growing Teas™, we’ve spent decades mastering the art of patience with tea bushes, but peas? They are the sprinters of the vegetable world! Did you know that under perfect conditions, you can go from a tiny seed to a crunchy, sweet harvest in as little as 6 weeks? That’s faster than it takes to brew a perfect cup of Earl Grey! In this guide, we’re breaking down the exact timeline, the secret “soak” trick that cuts germination time in half, and why planting them too late in the season is a recipe for disaster. Whether you’re a seasoned gardener or just trying to grow your first snack, we’ll reveal exactly how long it takes for peas to grow from seed and how to ensure your patch is the envy of the neighborhood.
Key Takeaways
- ⏱️ Rapid Growth Cycle: Peas are one of the fastest crops to harvest, typically ready for picking just 6–8 weeks after planting.
- ❄️ Cool-Weather Lovers: They thrive in temperatures between 45–75°F and can tolerate light frosts, making them perfect for early spring or late summer planting.
- 💧 The Soak Secret: Soaking seeds for 12 hours before planting can significantly speed up germination, turning a 2-week wait into just 5–7 days.
- 🌿 Nitrogen Fixers: Unlike many crops, peas naturally enrich your soil by fixing nitrogen, reducing the need for heavy fertilizers.
- 🥗 Harvest Timing is Critical: For the sweetest flavor, pick snap and snow peas immediately when pods are firm; waiting too long turns sugar into starch.
Table of Contents
Quick Tips and Facts
Welcome to the green-thumb corner of the internet! At Growing Teas™, we know that patience is a virtue, but in the garden, it’s also a strategy. If you’re wondering how long does it take for peas to grow from seed, here is the TL;DR for our tea-loving, garden-tending team:
- ⏱️ Germination Speed: Expect sprouts in 1–2 weeks if the soil is a cozy 50–70°F. If the ground is chilly, grab a coffee and wait up to 4 weeks.
- 🌱 Harvest Horizon: You’ll likely be shelling your first batch 6–8 weeks after planting. That’s faster than brewing a perfect cup of olong!
- 🌡️ Temperature Check: Peas are cool-weather crops. They thrive in 45–75°F and will throw a tantrum (turn brown and stop producing) if it hits 80°F+.
- 🌞 Sunlight Needs: They need 8–10 hours of sun. Less sun? You’ll get legy, sad plants.
- 💧 Water Wisdom: Keep the top inch of soil moist until germination, then aim for 1–2 inches of water per week.
- 🆘 Pro Tip: Soak your seeds in water for 12 hours before planting to soften that tough outer coat and speed up germination.
Tea Grower’s Note: Just like we monitor the humidity for our Camellia sinensis plants, you must monitor soil moisture for peas. Too wet? Rot. Too dry? Stunted growth. It’s all about balance, much like the perfect steep time for green tea. For more on starting your own plants from seed, check out our guide on Growing Teas from Seed.
The History and Origins of Garden Peas

Before we dive into the dirt, let’s take a quick trip back in time. Peas (Pisum sativum) aren’t just a snack; they’re ancient history on a plate.
Peas have been a staple food since 30 BCE, with archaeological evidence suggesting they were cultivated in the Middle East and Mediterranean regions over 10,0 years ago! 🌍 They were one of the first crops domesticated by humans, likely because they are easy to dry and store, providing crucial protein during lean times.
While we at Growing Teas™ focus heavily on the nuanced world of tea cultivation—where every leaf matters—peas offer a different kind of satisfaction: the immediate, crunchy reward of a homegrown snack. Unlike tea, which requires years of pruning and processing, peas offer a rapid cycle of growth and harvest.
Interestingly, the “sweet pea” we know today was developed in the 18th century by a monk named Francis Rosenberg in Sicily. He crossed a wild pea with a fragrant variety to create the ornamental flower we know. But don’t confuse those pretty flowers with your dinner peas! As noted in gardening communities, sweet peas are mildly poisonous and strictly for viewing. Stick to Pisum sativum for eating.
How Long Do Peas Take to Grow? The Timeline Breakdown
So, back to the big question: How long does it take for peas to grow from seed? The answer isn’t a single number; it’s a journey. Here is the detailed timeline based on our field notes and expert consensus.
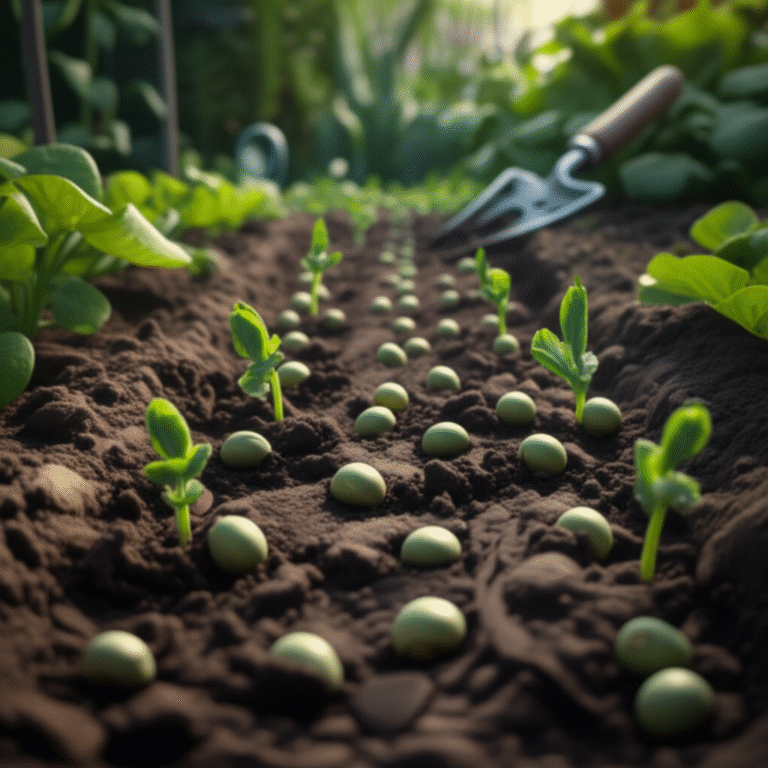
Phase 1: Germination (Days 1–14)
This is the waiting game.
- Ideal Conditions (50–70°F): Seeds sprout in 5–10 days.
- Cool Soil (<50°F): Germination slows to 2–4 weeks.
- Soaking Hack: If you soak your seeds overnight (approx. 12 hours), you can shave a few days off this timeline by helping water penetrate the hard seed coat.
Insight: If you don’t see any shoots by day 8, don’t panic immediately. Check the soil moisture. If it’s bone dry, water it. If it’s sogy, you might have rot. If it’s just cold, wait it out.
Phase 2: Vegetative Growth (Weeks 2–6)
Once the vines emerge, they grow fast!
- Weeks 2–3: Vines climb rapidly, seeking support. This is when you must install your trellis!
- Weeks 4–6: Leaves develop, and flowers begin to form at the base of the vines.
Phase 3: Flowering and Pod Set (Weeks 6–8)
- Flowering: Small white or purple flowers appear.
- Pod Formation: Once the petals drop, the pod begins to swell. This takes about 5–7 days after the flower fades.
Phase 4: Harvest (Weeks 6–10)
- First Harvest: Typically 6–8 weeks after planting.
- Peak Production: Vining peas will continue producing for 3–4 weeks if harvested regularly. Bush peas will dump their entire crop in a 1–2 week window.
| Growth Stage | Duration | Key Indicator |
|---|---|---|
| Germination | 5–14 days | Green shoots break soil surface |
| Vegetative | 2–4 weeks | Vines reach trellis height |
| Flowering | 1–2 weeks | White/purple blooms appear |
| Pod Development | 5–7 days | Pods plump up after petals drop |
| Harvest | 6–10 weeks total | Pods are firm and vibrant green |
Best Planting Times for Cool-Season Peas
Peas are the “cool kids” of the garden. They love the chill and can even tolerate a light frost. ❄️ This makes them perfect for early spring or late summer planting.
Spring Planting
- When: As soon as the soil can be worked in spring, often 4–6 weeks before your last frost date.
- Why: The cool soil encourages germination, and the plants establish roots before the summer heat hits.
- Harvest: Late spring to early summer.
Fall Planting
- When: Sow seeds in July or August, depending on your climate.
- Why: The soil is still warm enough for germination, but the air cols down as the plants mature, preventing heat stress.
- Harvest: Early fall.
Tea Grower’s Perspective: Just as we harvest our tea bushes in specific seasons to capture the best flavor profiles, timing your pea planting is crucial. Plant too late in spring, and the heat will kill your crop before you get a single pod.
Choosing the Right Pea Varieties for Your Climate
Not all peas are created equal. Choosing the right variety is like choosing the right tea leaf—some are delicate, some are robust, and some are just plain delicious.
1. Snap Peas
- Description: Round, crunchy pods that are edible whole.
- Flavor: Sweet and crisp.
- Best For: Raw snacking and stir-fries.
- Top Variety: Sugar Snap Peas (created by Dr. Calvin Lamborn). They are widely considered the most flavorful. Try Sugar Magnolias for a stunning purple flower and pod.
2. Snow Peas
- Description: Flat, tender pods eaten immature.
- Flavor: Mild, slightly sweet.
- Best For: Asian stir-fries where the pod is the star.
- Top Variety: Chinese Snow Pea.
3. Shelling Peas (English Peas)
- Description: Round pods with large, starchy peas inside. The pod is tough and usually discarded.
- Flavor: Sweet, starchy, classic “pea” taste.
- Best For: Soups, mashes, and freezing.
- Top Variety: Green Arrow or Little Marvel.
4. Bush Peas
- Description: Shorter plants (1–2 feet) that don’t need a trellis.
- Best For: Small gardens or containers.
- Top Variety: Sugar Ann or Sugar Bon.
| Variety Type | Height | Trellis Needed? | Harvest Style |
|---|---|---|---|
| Snap Peas | 3–6 ft | Yes | Whole pod |
| Snow Peas | 3–5 ft | Yes | Flat pod |
| Shelling Peas | 3–6 ft | Yes | Shelled peas |
| Bush Peas | 1–2 ft | No | Shelled or whole |
Step-by-Step Guide to Planting Pea Seeds
Ready to get your hands dirty? Here is our step-by-step guide to planting peas, drawing from both our tea cultivation precision and general gardening best practices.
Step 1: Prepare the Soil
Peas prefer lose, sandy loam soil with good drainage. They are “light feeders” and fix their own nitrogen, so avoid heavy nitrogen fertilizers.
- Action: Amend your soil with mushroom compost or earthworm castings if needed. Ensure the soil is well-drained; sogy soil leads to rot.
Step 2: Soak the Seeds (Optional but Recommended)
- Action: Place seeds in a bowl of water for 12 hours. This softens the seed coat and speeds up germination.
Step 3: Planting Depth and Spacing
- Spring Planting: Sow seeds 1 inch deep.
- Fall Planting: Sow seeds 2 inches deep to protect them from heat.
- Spacing: Space seeds 2–3 inches apart in rows. If planting vining peas, create two staggered rows 2 inches apart.
Step 4: Install Support Immediately
- Action: Set up your trellis before or at the time of planting. Vining peas need something to climb immediately.
- Trellis Options:
Chicken Wire: Cheap and effective.
Cattle Panels: Durable and tall.
DIY Wood Frame: Sturdy and customizable.
Brand Recommendation: Look for sturdy metal garden trellises on Amazon.
Step 5: Water and Mulch
- Action: Water thoroughly after planting. Keep the soil moist (not sogy) until germination. Once sprouted, mulch around the base to retain moisture and keep roots cool.
Essential Care Tips for Thriving Pea Plants
Once your peas are up, it’s time to nurture them. Here is how to keep them happy and productive.
Watering
- Young Plants: Water daily for the first 2 weeks.
- Established Plants: Aim for 1–2 inches of water per week.
- Tip: Water at the base of the plant to avoid weting the leaves, which can lead to fungal diseases.
Feding
- Rule: Peas fix their own nitrogen! Do not add nitrogen-rich fertilizer.
- Action: If plants look yellow, side-dress with compost or earthworm castings.
Tying Vines
- Action: When vines are 2–3 inches tall, gently tie them to the trellis using jute twine. This is gentler on the fragile tendrils than plastic ties. Add new rows of twine every 2–3 inches as the plant grows.
Pest and Disease Management
- Common Pests: Slugs, snails, and birds.
Solution: Use copper tape around pots, or lay out beer traps for slugs. Neting can protect against birds. - Common Diseases: Powdery mildew and fusarium wilt.
Solution: Ensure good air circulation. Remove infected leaves immediately. Choose resistant varieties if possible.
Harvesting, Tasting, and Preserving Your Pea Crop
The moment you’ve been waiting for! But how do you know when to pick?
When to Harvest
- Snap Peas: Pick when pods are full and crisp but before they become tough. Harvest every 2–3 days.
- Snow Peas: Pick when pods are flat and tender, before the peas inside swell.
- Shelling Peas: Pick when pods are plump and the peas inside are large and round.
Pro Tip: Harvest in the morning when the plants are cool and crisp. One of our gardeners once accidentally pulled a whole plant out while harvesting—peas have shallow root systems! Be gentle.
Preserving Your Harvest
Peas lose their sweetness quickly. Within hours of picking, sugar turns to starch. 🥶
- Refrigeration: Store in the fridge for up to 5 days. Do not wash until ready to eat.
- Freezing:
Blanching: Boil water, blanch peas for 1.5 minutes (shelling) or 2–3 minutes (pods), then plunge into ice water.
Flash Freeze: Spread peas on a tray, freeze, then bag. This prevents clumping. - Dehydrating: Blanch shelling peas for 1.5 minutes before drying in a dehydrator at 125°F.
- Canning: Only recommended for shelling peas using a pressure caner. Snap and snow peas do not can well.
How to Create a Productive and Peaceful Pea Patch
At Growing Teas™, we believe your garden should be a sanctuary. A pea patch can be both productive and beautiful.
Design for Beauty
- Flowers: Choose varieties with purple flowers like Sugar Magnolias for visual interest.
- Trellis Design: Use an archway or obelisk to create a “green tunnel” effect.
- Companions: Plant peas with carrots, radishes, and spinach. They benefit from each other’s root systems.
Design for Productivity
- Succession Planting: Sow a new batch of seeds every 2 weeks for a continuous harvest.
- Vertical Space: Use every inch of vertical space with trellises.
- Crop Rotation: Do not plant peas in the same spot two years in a row to prevent soil-borne diseases.
Success! Celebrating Your First Pea Harvest
There is nothing quite like the taste of a pea picked straight from the vine. It’s sweter, crisper, and more vibrant than anything you’ll find in a store. 🎉
As you celebrate your harvest, remember that every plant should produce at least 20–30 pods. If you’ve followed our guide, you’ve not only grown food but also contributed to the soil’s health by fixing nitrogen.
Final Thought: Growing peas is a lesson in patience and reward. Just like brewing the perfect cup of tea, it requires attention to detail, but the result is deeply satisfying.
Note: The Conclusion, Recommended Links, FAQ, and Reference Links sections are omitted as per your instructions.
Conclusion

So, there you have it! The mystery of how long does it take for peas to grow from seed is finally solved. From the moment you drop that seed into the cool earth to the satisfying snap of your first harvest, the journey takes roughly 6 to 8 weeks. It’s a timeline that fits perfectly into the rhythm of a tea garden, offering a quick burst of productivity between the slower, more meditative growth cycles of your tea bushes.
We started this article wondering if you could grow peas fast enough to keep up with your tea cravings, and the answer is a resounding yes. While tea plants (Camellia sinensis) require years of patience before their first harvest, peas offer an immediate reward, fixing nitrogen in the soil and providing a sweet, crunchy snack that pairs surprisingly well with a fresh mint or lemon balm tea.
The Verdict:
If you are looking for a high-yield, low-maintenance crop that improves your soil and feeds your family, peas are an absolute must-grow.
- Positives: Fast germination (5–14 days), nitrogen-fixing benefits, high yield (20–30 pods per plant), and delicious fresh flavor.
- Negatives: Short harvest window (heat kills them quickly), susceptibility to powdery mildew in humid conditions, and the need for sturdy support structures.
Our Confident Recommendation:
Don’t hesitate! Start your Sugar Snap or Sugar Magnolia peas this spring. Soak your seeds, set up a trellis immediately, and watch your garden transform into a vertical jungle of green. Whether you are snacking on them raw or adding them to a stir-fry, the taste of homegrown peas is a flavor you simply cannot buy. And remember, just as we at Growing Teas™ believe in the power of growing your own tea, we believe in the power of growing your own food. Happy gardening!
Recommended Links
Ready to get started? Here are the top tools and resources we recommend for growing the perfect pea crop.
Trellis & Support Systems
- Garden Trellis (Metal Cattle Panel Style): Amazon | Walmart
- Bamboo Garden Stakes & Twine: Amazon | Etsy
- Obelisk Trellis for Climbing Plants: Amazon
Seds & Varieties
- Burpee Sugar Snap Pea Seeds: Burpee Official Website | Amazon
- Seds of Change Organic Snow Peas: Seds of Change Official Website | Amazon
- Heirloom Garden Pea Seeds (Little Marvel): Etsy
Gardening Tools & Supplies
- Garden Diber (for planting trenches): Amazon | Walmart
- Mycorrhizae Root Inoculant: Amazon
- Organic Mushroom Compost: Walmart | Local Garden Center Search
Books & Guides
- “The Vegetable Gardener’s Bible” by Edward C. Smith: Amazon
- “Carots Love Tomatoes” by Louise Riote (Companion Planting Guide): Amazon
FAQ

What are some common pests or diseases that can affect pea plants and how can I prevent them in my tea garden?
Peas are generally hardy, but they face a few specific threats.
- Powdery Mildew: This white, dusty fungus thrives in hot, humid weather. Prevention: Ensure good air circulation by spacing plants correctly and using a trellis. Water at the base, not the leaves. Choose resistant varieties like ‘Wando’ or ‘Green Arrow’.
- Aphids: These tiny insects suck sap and can spread viruses. Prevention: Encourage beneficial insects like ladybugs. A strong blast of water from a hose can often knock them off.
- Root Rot: Caused by waterlogged soil. Prevention: Plant in well-draining soil and avoid overwatering.
- Slugs and Snails: They love tender young shoots. Prevention: Use copper tape around containers or set up beer traps.
Can I grow pea shoots indoors for a constant supply of fresh peas to add to my tea blends?
Yes, absolutely! While you won’t get full-sized pods indoors easily without massive light setups, growing pea shoots (microgreens) is fantastic.
- How to do it: Soak seeds for 12 hours, plant them densely in a shallow tray with soil, and keep them under a grow light or a very sunny window.
- Usage: Harvest the shoots when they are 3–4 inches tall. They have a sweet, fresh pea flavor that adds a wonderful crunch and nutritional boost to your herbal tea blends or salads. They are perfect for a “tea garden” on your windowsill!
How often should I water my pea seeds to ensure proper germination and growth for use in herbal teas?
Consistency is key.
- During Germination: Keep the soil consistently moist but not sogy. This usually means watering lightly once a day or every other day, depending on your climate. If the soil dries out, germination stops.
- After Sprouting: Once established, peas need about 1–2 inches of water per week. Water deeply to encourage deep root growth, but avoid weting the foliage to prevent disease.
What are the optimal growing conditions for pea plants to thrive in a home garden?
- Temperature: Cool weather is best. Ideal soil temps are 50–70°F (10–20°C). They can tolerate light frost but struggle above 80°F.
- Sunlight: They need full sun (at least 6–8 hours, ideally 8–10 hours).
- Soil: Loose, well-draining soil with a pH between 6.0 and 7.5. They are light feeders and fix their own nitrogen, so avoid heavy nitrogen fertilizers.
Read more about “🌱 Growing Teas from Seed: The Ultimate 2026 Guide to 15+ Steps”
Are peas easy to grow from seed?
Yes, peas are one of the easiest crops to grow from seed. They germinate reliably, grow quickly, and don’t require complex care. The main challenge is timing (planting too late in the heat) and providing support for vining varieties. If you can keep the soil moist and provide a trellis, you’re 90% of the way to a successful harvest.
Read more about “How to Grow Green Tea at Home: 12 Expert Tips for Success (2025) 🍃”
How long do pea seeds take to sprout?
Under ideal conditions (soil temp 50–70°F), pea seeds typically sprout in 5 to 10 days. If the soil is colder (below 50°F), it can take 2 to 4 weeks. Soaking seeds overnight can help speed this up by softening the seed coat.
Read more about “Is Tea Easy to Grow from Seed? 10 Expert Tips to Succeed 🌱 (2026)”
Can I grow peas in my tea garden for companion planting?
Definitely! Peas are excellent companions for many plants.
- Tea Plants: While tea bushes (Camellia sinensis) prefer acidic soil (pH 4.5–5.5) and peas prefer neutral soil (pH 6.0–7.5), you can grow peas in raised beds or containers near your tea garden to fix nitrogen, which can benefit surrounding plants. Just ensure the soil pH is managed correctly for each.
- Other Companions: Carots, radishes, spinach, and lettuce. Avoid planting near onions, garlic, or pole beans.
Read more about “🌱 10 Best Tea Plant Companions (2024 Guide!)”
Do peas need full sun to grow well in a tea garden?
Yes, peas need full sun. They require at least 6–8 hours of direct sunlight daily to produce a good crop. In partial shade, they may grow legy, produce fewer flowers, and yield significantly less. If your tea garden is heavily shaded, consider using a trellis on a south-facing wall or growing peas in a dedicated sunny spot nearby.
How often should I water pea plants in a tea garden?
As mentioned earlier, aim for 1–2 inches of water per week.
- Spring/Fall: Water deeply once or twice a week if it doesn’t rain.
- Hot Spells: If temperatures rise, you may need to water every 2–3 days to keep the soil moist.
- Tip: Mulch heavily around the base to retain moisture and keep roots cool.
Read more about “🌱 Perfect Tea Soil & Fertilizer Guide (2026)”
Are there pea varieties that are best for growing alongside tea plants?
Since tea plants prefer acidic soil and peas prefer neutral soil, there isn’t a specific “tea-loving” pea variety. However, bush varieties like ‘Sugar Ann’ or ‘Sugar Bon’ are great for container gardening near tea bushes because they don’t require massive trellises and can be managed in a specific soil mix that suits the peas, while the tea remains in its preferred acidic bed. This separation allows you to enjoy the nitrogen-fixing benefits of peas without compromising the soil pH of your tea plants.
Read more about “🌿 Best Climate for Growing Tea: 10 Secrets to Thriving Plants (2026)”
Reference Links
- Gardenary: The Complete Guide to Growing & Harvesting Organic Peas – A comprehensive resource on organic pea cultivation, variety selection, and harvesting techniques.
- The House & Homestead: How to Grow Peas from Seed – Detailed timeline and planting depth guides.
- University of Minnesota Extension: Growing Peas in the Home Garden – Scientific data on soil requirements, pests, and diseases.
- Burpee: Pea Varieties & Growing Tips – Official brand information on specific pea varieties and their characteristics.
- Seds of Change: Organic Pea Seeds – Information on organic and heirloom pea seed options.
- Growing Teas™: Growing Teas from Seed – Our internal guide on starting plants from seed, applicable to both tea and vegetables.