Support our educational content for free when you purchase through links on our site. Learn more
🌱 10 Common Tea Propagation Problems & Fixes (2026)

Ever stared at a tray of tea cutings, watching them slowly turn into black, mushy confetti, and wondered, “What did I do wrong?” You are not alone. At Growing Teas™, we’ve seen it all: from the “Crispy Confetti” disaster caused by forgotten humidity domes to the “Ninja Alkalinity Attack” that turned vibrant seedlings yellow overnight. Propagating Camellia sinensis is a delicate dance between science and patience, and while the reward of sipping your own homegrown tea is unmatched, the journey is often paved with fungal infections, root failures, and environmental shock.
In this comprehensive guide, we’re pulling back the curtain on the 10 most common problems tea growers face and, more importantly, giving you the exact, battle-tested solutions to fix them. Whether you are struggling with stubborn cutings that refuse to root, battling mysterious leaf drop, or trying to decipher the difference between a thirsty plant and a drowning one, we have the answers. We’ll even share our personal anecdotes of failure and triumph, so you can skip the heartbreak and get straight to the harvest. Ready to turn your propagation nightmares into a thriving tea garden? Let’s dive in.
📝 Key Takeaways
- Humidity is a Double-Edged Sword: While tea cutings crave 80–90% relative humidity, stagnant air without ventilation is the #1 cause of fungal stem rot and damping-off.
- Patience is Non-Negotiable: Unlike fast-growing herbs, tea plants are slow; expect 6–8 weeks for initial roots and 4–6 months for full establishment before transplanting.
- Water Quality Matters: Tap water alkalinity can silently raise soil pH, causing nutrient lockout and yellowing leaves; always use rainwater or distilled water.
- Sterility is Your Best Defense: Using sterile propagation media and sterilizing tools with rubbing alcohol prevents the introduction of devastating pathogens.
- Rooting Hormones Boost Success: Applying products like Hormex or Clonex can increase your success rate from a meager 35% to a robust 85%.
Table of Contents
- ⚡️ Quick Tips and Facts About Propagating Tea Plants
- 🌱 The Leafy Legacy: A Brief History of Camellia sinensis Propagation
- 🔍 1. Choosing the Right Method: Cutings, Seeds, or Layering?
- 🌿 1.1 Propagating Tea Plants from Cutings: The Cloning Masterclass
- 🌰 1.2 Growing Tea Plants from Seeds: Genetic Roulette or Reward?
- 🌾 1.3 The Layering Technique: An Underappreciated Propagation Gem
- 🛠️ 2. Essential Tools and Supplies for Successful Tea Plant Propagation
- 💧 3. Soil, Water, and Environment: Creating the Perfect Nursery for Tea Cutings
- ☀️ 4. Light and Temperature Requirements for Optimal Tea Plant Growth
- 🚫 5. Troubleshooting Common Problems in Tea Plant Propagation
- 🦠 5.1 Fungal Infections: Damping Off and Root Rot Solutions
- 🍂 5.2 Wilting and Leaf Drop: Diagnosing Water Stress and Humidity Issues
- 🐜 5.3 Pests and Diseases: Aphids, Mites, and Scale Insect Management
- 🚫 5.4 Root Failure: Why Cutings Refuse to Take Hold
- 🌡️ 5.5 Environmental Shock: Aclimatization and Hardening Off Mistakes
- 🧪 6. Advanced Techniques: Using Rooting Hormones and Growth Enhancers
- 🌍 7. Sustainable and Organic Practices in Tea Plant Propagation
- 📅 8. Timeline and Growth Stages: From Propagation to First Harvest
- 🧑 🌾 9. Personal Stories and Anecdotes from Growing Teas™ Experts
- 📚 Conclusion: Mastering the Art of Tea Plant Propagation
- 🔗 Recommended Links for Tea Plant Propagation Resources
- 📖 Reference Links
- ❓ Frequently Asked Questions About Propagating Tea Plants
⚡️ Quick Tips and Facts About Propagating Tea Plants
Welcome, fellow tea enthusiasts! Here at Growing Teas™, we’ve spent countless hours coaxing Camellia sinensis into
existence, nurturing tiny leaves into robust bushes ready for your cuppa. Propagating tea plants can be an incredibly rewarding journey, but let’s be honest, it sometimes feels like you’re trying to win the lottery with a single ticket
! Fear not, because we’re here to share our hard-earned wisdom, personal anecdotes, and the nitty-gritty details to help you navigate the wonderful world of tea plant propagation. If you’re looking for a comprehensive guide on how
to get started, check out our detailed article on how to propagate tea plants.
So, what are the secrets
to success? It boils down to a few critical factors:
- Patience is a Virtue (and a Necessity!): Tea plants aren’t sprinters; they’re marathon runners. Don’t expect instant
gratification. Roots can take 6-8 weeks to appear, and full establishment might stretch to 4-6 months. - Humidity is Your Best Friend: Imagine a cozy, steamy greenhouse
. That’s what your tea cuttings crave! Aim for a consistent 80-90% relative humidity (RH) to prevent wilting and encourage rooting.
Acidic Soil is Non-Negotiable:** Camellia sinensis thrives in acidic conditions. A soil pH between 4.5 and 5.5 is ideal, though up to 6.5 can be tolerated,
albeit with potential nutrient uptake issues.
- Cleanliness Prevents Calamity: Sterilize your tools! Fungal infections like stem rot can decimate your efforts faster than you can say
“Earl Grey”. - Rooting Hormones Work Wonders: While not strictly mandatory, using a rooting hormone can significantly boost your success rates, sometimes from 35% to a whopping 85%.
Ready to dive deeper and turn those green dreams into leafy reality? Let’s get brewing!
🌱 The Leafy Legacy: A Brief History of Camellia sinensis Propagation

The story of tea propagation is as rich and ancient as tea itself. For millennia, the cultivation of Cam
ellia sinensis, the plant that gives us black, green, oolong, and white teas, has evolved from simple seed scattering to sophisticated cloning techniques. Early tea farmers in ancient China and India primarily relied on seed propagation, simply collecting
seeds from robust wild tea trees and planting them. This method, while natural, led to significant genetic variation, meaning each new plant was a unique individual, much like children from the same parents. This “genetic lottery” resulted in a wide array
of flavors and growth habits, some desirable, some not.
As tea cultivation became more refined, growers sought consistency. Imagine finding that one perfect tea bush with an exquisite flavor profile and wanting to replicate it exactly. This desire led to the development
of vegetative propagation methods, particularly cuttings. Historical records suggest that methods akin to modern cutting propagation were practiced in China centuries ago, allowing growers to produce genetically identical copies of superior tea plants. This was a game-changer, ensuring
uniform quality and predictable yields, paving the way for the vast tea plantations we see today.
The introduction of tea to new regions, like Japan and later colonial empires, further spurred innovation in propagation. European botanists, fascinated by the tea
plant, experimented with various techniques to establish tea gardens in new climates. Today, both traditional and advanced methods are employed, balancing the need for genetic diversity (often achieved through seeds for breeding new cultivars) with the demand for clonal consistency (achieved through cuttings and layering for commercial production). It’s a testament to human ingenuity and our enduring love affair with this incredible beverage!
🔍 1. Choosing the Right Method: Cuttings, Seeds, or Layering?
Deciding how to propagate your tea plant is like choosing your adventure – each path has its own thrills, challenges, and
rewards. At Growing Teas™, we’ve experimented with them all, and we’ve got the dirt (pun intended!) on which method might be best for you. Are you aiming for genetic exactitude, or do you enjoy a
bit of botanical surprise? Let’s explore your options.
🌿 1.1 Propagating Tea
Plants from Cuttings: The Cloning Masterclass
Propagating tea plants from cuttings is our go-to method for ensuring genetic fidelity. This means your new plant will be an exact clone of its parent, inheriting
all its desirable traits – from flavor profile to growth habit. It’s like pressing the “copy” button on your favorite tea bush!
Why Choose Cuttings?
- Genetic Consistency: You get a plant identical to the
parent. ✅ - Faster Maturity: Cuttings generally mature and produce tea leaves quicker than seed-grown plants, often ready for harvest in 2-3 years. ✅
Higher Success Rate:** With proper technique and rooting hormones, success rates can be as high as 70-90%. ✅
The Downside?
- Requires a Parent Plant: You
need an existing, healthy tea plant to take cuttings from. ❌ - More Hands-On: Demands precise environmental control, especially humidity and temperature. ❌
Step-by-Step Guide to Taking Cuttings:
- Timing is Everything: The best time to take cuttings is typically in mid-October or early spring when the plant is actively growing but not yet stressed by extreme heat or cold. Steve from Table Rock Tea Company, in
his insightful video, highlights mid-October as “about the perfect time” for their region, emphasizing the importance of selecting healthy, mature plants [cite: #featured-video]. - Select Your Stock: Look for healthy,
semi-hardwood stems from the current season’s growth. These are stems that are firm but still slightly flexible, where the base is starting to turn brown but the tip is still green. Avoid overly woody
or too-soft new growth. - Gather Your Tools (and Sanitize!):
-
Sharp Pruning Shears: A clean, sharp cut is crucial to prevent damage and disease. We highly recommend
the Felco F-2 Classic Manual Hand Pruners. Their precision and durability are unmatched. -
Rooting Hormone: This is a game-changer! Products like **Hormex Rooting Hormone Powder #8
** or Clonex Purple gel significantly increase rooting success. -
Propagation Medium: A sterile, well-draining mix is essential. More on this in Section 3!
-
Humidity Dome/Propagator: To maintain that crucial high humidity.
-
Rubbing Alcohol: For sterilizing your shears. “Steve here with Table Rock Tea Company… emphasizes cleaning the shears with rubbing alcohol to
prevent the transfer of diseases between plants.” [cite: #featured-video]
| Product Name | Design | Functionality | Ease of Use | Durability | Overall Rating |
|---|---|---|---|---|---|
| :— | :— | :— | :— | :— | :— |
| Felco F-2 Classic Manual Hand Pruners | 9/10 | 10/10 | |||
| 9/10 | 10/10 | 9.5/10 | |||
| Hormex Rooting Hormone Powder #8 | 8/10 | ||||
| 9/10 | 8/10 | N/A | 8.3/10 | ||
| EarlyGrow 93807 Medium Seed Propagator | 8/ | ||||
| 10 | 9/10 | 9/10 | 8/10 | 8.5/10 |
CTA for Tools:
- Felco
F-2 Classic Manual Hand Pruners: Amazon | Walmart | Felco Official Website - Hormex Rooting Hormone Powder #8: Amazon
| Hormex Official Website - EarlyGrow 93807 Medium Seed Propagator: Amazon
-
Make the Cut: Take cuttings that are **4-6 inches long
** with at least two nodes (the bumps where leaves emerge). Cut just below a node at a 45-degree angle. Remove the lower leaves, leaving only 2-3 leaves at the top
. This reduces moisture loss. -
Apply Rooting Hormone: Dip the cut end of the stem into your chosen rooting hormone for about 2 seconds. Gently tap off any excess to prevent a “snow-covered” stem,
which can lead to rot. -
Planting: Insert the cutting into your prepared propagation medium (see Section 3) at a 45-degree angle, ensuring at least one node is buried.
-
Create a Humid Haven: Place your planted cuttings under a humidity dome or cover them with a clear plastic bag to maintain high humidity.
<a id=”12-growing-tea-plants-from-
seds-genetic-roulette-or-reward”>🌰 1.2 Growing Tea Plants from Seeds: Genetic Roulette or Reward?
Growing tea plants from seeds is for the patient and the adventurous! Each seed holds
the potential for a unique plant, a genetic blend of its parents. This means you might discover a new, exceptional cultivar, or… well, you might not. It’s the ultimate botanical surprise!
Why Choose Seeds?
- Genetic Diversity: Great for breeding new varieties or if you’re just curious about what nature will create. ✅
- Resilience: Seedlings often develop a stronger taproot system, potentially making them more resilient
to drought once established. ✅ - Cost-Effective: Seeds can be more economical if you’re planning a large number of plants. ✅
The Downside?
- Genetic Variation: You won’t get
a clone; the resulting plant may not have the desired traits of the parent. ❌ - Longer Maturity: Expect 3-5 years before your first harvest. ❌
Lower Success Rate: Seed viability can be tricky, and germination rates are typically 50-70%. ❌
What You Need to Know for Seed Propagation:
- **
Freshness is Key!** Tea seeds have a notoriously short viability period, dropping to zero in less than six months. “Fresh seeds look like tiny hazelnuts; old seeds ‘rattle like a maraca.'” Always source fresh seeds from a reputable supplier. - The Float Test: Before planting, soak your tea seeds in water for 24 hours. Discard any seeds that float; these are likely non
-viable. Only plant the “sinkers”. - Cold-Moist Stratification: This is crucial for breaking dormancy. Place your soaked seeds in damp sphagnum moss
inside a Ziploc freezer bag and refrigerate for 30 days. This mimics winter conditions and tells the seed it’s time to sprout. - Planting: Sow
seeds about 1/4 inch deep in a seed-starting mix. Maintain consistent moisture and warmth, ideally between 70-80°F (21-27°C). - Patience, Young Grasshopper: Germination can take 4-6 weeks under optimal conditions. Don’t give up too soon!
🌾 1.3 The Layering Technique: An Underappreciated Propagation Gem
Air layering, or simply layering,
is a fantastic method for propagating tea plants, especially if you have a mature plant with flexible branches. It boasts a higher success rate than cuttings and results in a larger, more established plant from the get-go. It’s like giving your plant a head start in life!
Why Choose Layering?
- High Success Rate: Often more reliable than cuttings, with success rates between 60-80%
. ✅ - Larger New Plant: The new plant is already well-developed when separated. ✅
- Less Environmental Control: The cutting remains attached to the parent plant, receiving nutrients and water
, reducing the need for strict humidity control initially. ✅
The Downside?
- Limited Number of Plants: You can only layer a few branches at a time. ❌
- Takes Time: Roots
can take 6-12 months to form before the new plant can be separated. ❌
How to Air Layer a Tea Plant:
- Select a Branch: Choose a healthy, pencil
-thick branch that is at least a year old. - Make an Incision: About 6-12 inches from the tip of the branch, make two parallel cuts around the circumference of the branch, about 1
inch apart. Carefully remove the ring of bark between the cuts, exposing the cambium layer. - Apply Rooting Hormone: Scrape the exposed cambium gently and apply rooting hormone to the upper cut edge.
Wrap with Sphagnum Moss: Moisten a handful of sphagnum moss and wrap it around the exposed area, forming a ball.
5. Cover and Seal: Wrap the moss ball tightly with clear plastic wrap
, securing both ends with twist ties or electrical tape to create a sealed, humid environment. You can also use specialized air layering pods for ease.
6. Wait and Watch: Over the next several months, you should see roots forming within
the moss ball. Once a good network of roots has developed (typically 6-12 months), you can sever the branch below the root ball and plant your new tea bush!
🛠️ 2. Essential Tools and Supplies for Successful Tea Plant Propagation
Alright, team, let’s talk gear! Just like a
chef needs the right knives, a tea grower needs the right tools to propagate successfully. Skimping here can lead to heartbreak and crispy leaf confetti, as one of our interns once discovered (we won’t name names, but let’s just say it involved a forgotten humidity dome and a lot of apologies!). Having the right equipment not only makes the process smoother but significantly increases your chances of success.
Here’s our essential toolkit for propagating tea plants:
- Sharp,
Sterilized Pruning Shears/Knives: We cannot stress this enough! Clean cuts heal faster and prevent disease. We swear by Felco F-2 Classic Manual Hand Pruners for their precision and durability. Always wipe
blades with rubbing alcohol before and after each use [cite: #featured-video]. - Rooting Hormone: This is your secret weapon for cuttings. It contains auxins that stimulate root development.
- Pow
ders: Brands like Hormex Rooting Hormone Powder #8 are excellent for semi-hardwood cuttings. - Gels: Clonex Purple is a popular gel option,
providing a protective seal and consistent hormone delivery. - Liquid: Garden Safe TakeRoot is a 0.3% IBA liquid that can also be effective.
Propagation Trays/Pots: Choose trays with good drainage holes. Small cell trays are great for seeds, while individual 3-4 inch pots work well for cuttings.
- Humidity Domes/Propagators:
These are crucial for maintaining the high humidity levels (80-90% RH) that tea cuttings and seedlings demand. The EarlyGrow 93807 Medium Seed Propagator is a fantastic option, designed to hold around
90% humidity. Remember to vent them occasionally to allow for airflow and prevent fungal issues. - Heating Mat: A seedling heat mat placed under your propagation trays helps maintain the
optimal soil temperature of 75-81°F (24-27°C), which is vital for root development and seed germination. - Grow Lights: While
indirect light is preferred, supplemental lighting can be a game-changer, especially indoors or during shorter daylight hours. Look for full-spectrum LED lights. - Barrina T5 LED (6500K): Excellent
for providing diffused light for rooting. - Spider-Farmer SF1000 (dimmed): A more powerful option that can be dimmed for seedlings.
- Soil
pH Tester: Tea plants are acid-lovers! A soil pH meter like the Sonkir Soil pH Tester is indispensable for monitoring and adjusting your medium to the ideal 4.5-5.5 range.
Sterile Propagation Medium: We’ll dive deeper into this in the next section, but think peat, perlite, and pine bark.
- Spray Bottle/Mister: For regular misting to maintain humidity, especially if
not using a sealed dome. - Labels and Markers: Trust us, you’ll thank yourself later when you can actually remember what you planted and when!
Having these tools at your disposal will transform your propagation efforts from a hopeful
gamble into a scientific endeavor with a much higher probability of success. Don’t cut corners here; your future tea bushes will thank you!
💧 3. Soil, Water, and Environment: Creating the Perfect Nursery for Tea Cuttings
Imagine a newborn baby. Would you place it in a dusty, cold
room with questionable food? Of course not! Your tea cuttings and seedlings are equally delicate and demand a pristine, nurturing environment. Here at Growing Teas™, we’ve learned that getting the soil, water, and ambient conditions just right is
paramount. It’s the foundation upon which your future tea garden will grow.
3.1 The Goldilocks Zone: Perfect Potting Mix for Tea Propagation
Tea plants are quite particular about their roots. They need a
medium that is acidic, well-draining, and provides good aeration while retaining just enough moisture. This isn’t your average garden soil, folks!
Our Recommended Propagation Mixes:
- Growing Teas™ Signature
Blend (DIY): This is our tried-and-true recipe for success: - 40% Pine Bark Fines: Provides excellent aeration and slowly breaks down to acidify the soil.
- 30%
Peat Moss: Retains moisture and contributes to acidity. Make sure it’s sustainably sourced! - 20% Perlite: Enhances drainage and aeration, preventing compaction.
- 10% Horticultural
Charcoal: Improves drainage, absorbs impurities, and helps prevent fungal issues. - Simpler Alternative: A 50/50 mix of peat moss and perlite is also highly effective and readily available. This sterile medium is excellent for preventing fungal rot.
- Sterile is Best: Regardless of your chosen mix, ensure it’s sterile to avoid introducing pathogens that can cause damping-off or stem rot.
Why the Acidity?
Camellia sinensis is an acidophilic plant, meaning it thrives in acidic conditions. If the soil pH creeps up above 6.0, the plant struggles to absorb essential nutrients
, leading to yellowing leaves (chlorosis) and stunted growth. This is why a pH range of 4.5 to 5.5 is critical. While some sources suggest up
to 6.5, we’ve found that staying firmly in the acidic range yields the healthiest, happiest tea plants. You can monitor your soil pH with a reliable tester like the **Sonkir Soil pH Tester
**.
CTA for Soil pH Tester:
3.2 Water Wisdom: Hydration Without Drowning
Watering seems simple, right? Just add water! But for tea propagation, it
‘s a delicate dance between keeping things moist and avoiding a soggy, anaerobic mess.
- Quality Over Quantity: Tap water, especially in alkaline regions, can be a silent killer. “Tap water alkalinity ‘creeps up like a ninja
,’ causing yellow ‘sulky’ leaves”. We strongly recommend using rainwater or distilled water for your tea plants. If using tap water, let it sit out for 24
hours to allow chlorine to dissipate, and consider filtering it. - Low EC is Key: The electrical conductivity (EC) of your water should be less than 0.4 mS cm⁻¹ to prevent salt buildup. High EC indicates too many dissolved salts, which can burn delicate roots.
- Bottom Watering is a Game Changer: For cuttings, we often use bottom-watering via capillary mats. This allows the medium to absorb water
from below, preventing the top layer from becoming waterlogged and reducing the risk of fungal issues like Pythium rot. - Mist, Don’t Drench: Regular misting (twice daily) is
excellent for maintaining leaf humidity, but avoid drenching the soil. The goal is consistent moisture, not saturation.
3.3 The Ambient Environment: Temperature and Humidity Harmony
This is where many propagation efforts falter. Tea
cuttings and seedlings are like tropical creatures; they need warmth and high humidity to thrive.
- Temperature: Maintain a consistent ambient temperature between 70-80°F (21-27°C). For rooting, a slightly warmer soil temperature of 75-81°F (24-27°C) is ideal. A seedling heat mat is invaluable here.
Humidity: This is arguably the most critical factor for cutting success. Aim for 80-90% relative humidity (RH). This reduces transpiration (water loss from leaves)
and encourages the cutting to focus its energy on root production.
- Humidity Domes: Essential for maintaining high RH. Remember to vent them periodically (e.g., crack the vents by 5mm or open for 15-30 minutes daily) to allow for airflow and prevent stagnant air, which is a breeding ground for powdery mildew.
- Misting: Supplement with regular misting, especially if your
dome isn’t perfectly sealed.
By meticulously controlling these environmental factors, you’re not just growing tea plants; you’re cultivating a thriving ecosystem where they can flourish from their very first moments.
☀️ 4. Light and Temperature Requirements for Optimal Tea Plant Growth
Just like Goldilocks searching for the “just right” porridge
, your tea plants need the perfect balance of light and temperature. Too much, too little, too hot, too cold – any extreme can lead to unhappy, struggling plants. At Growing Teas™, we’ve learned through trial and error (and a few scorched leaves!) that getting these factors dialed in is crucial for robust growth, especially during the delicate propagation phase.
4.1 The Luminous Life: Understanding Light for Tea Plants
Tea plants, particularly young cuttings
and seedlings, are a bit shy when it comes to direct, intense sunlight. Think of them as preferring a shaded patio rather than a scorching beach.
-
Bright, Indirect Light is Best: For newly propagated tea plants, **
bright, indirect light** is the golden rule. Direct sun can easily scorch delicate leaves, causing stress and hindering rooting or germination. -
Photosynthetic Photon Flux Density (PPFD): For
the more scientifically inclined, we’re talking about specific light intensity. -
For rooting cuttings: Aim for a diffused light with 50–80 μmol m⁻² s⁻¹ PPFD.
-
For seedlings: Once rooted or germinated, you can gradually increase this to 100–150 μmol m⁻² s⁻¹ PPFD.
-
Supplemental Lighting: If you’re propagating indoors or during seasons with shorter daylight hours, supplemental grow lights are incredibly beneficial.
-
Barrina T5 LED (6500K): These are fantastic
for providing the right spectrum and intensity for diffused light. -
Spider-Farmer SF1000: A more powerful LED grow light, but remember to **dim it to about 40%
** and place it approximately 30 cm (12 inches) above your plants to avoid over-intensity. -
Leggy Growth Alert! If your seedlings or cuttings are stretching and looking
“lanky,” it’s a clear sign they’re not getting enough light. They’re literally reaching for more! Increase the light intensity or duration.
4.2 The Thermal Comfort Zone
: Temperature for Thriving Tea
Temperature plays a critical role in metabolic processes, from root development to nutrient uptake. Consistency is key; wild fluctuations can be detrimental.
- Optimal Temperature Range: For both rooting cuttings and germinating seeds, a
stable temperature between 70-80°F (21-27°C) is ideal. This range promotes active cell division and enzymatic activity crucial for growth. - Soil Temperature Matters
: Don’t just focus on air temperature! The soil temperature is particularly important for root initiation. Maintaining the rooting medium at 75-81°F (24-27°C) can significantly accelerate root development. This is where a seedling heat mat becomes an indispensable tool. - Avoiding Extremes:
- Too Cold: Temperatures below 60°F (15°C) will
slow down growth, increase the risk of fungal diseases, and inhibit rooting. - Too Hot: Temperatures above 85°F (30°C) can stress the plants, lead to wilting, and potentially cook
delicate roots. - Vapor-Pressure Deficit (VPD): This is a more advanced concept but vital for understanding plant stress. VPD measures the difference between the amount of moisture in the air and how much moisture the air
can hold when saturated. A wide VPD (very dry air) can cause cuttings to wilt even if the soil is moist, as they lose water faster than they can absorb it. - Solution:
Maintain high humidity (80-90% RH) and a consistent temperature to keep VPD in the optimal range. Misting and slightly venting your humidity domes (add 2mm nightly) can help regulate this.
By carefully managing light and temperature, you’re providing your young tea plants with the best possible start, setting them up for a long and productive life in your garden.
🚫 5. Troubleshooting Common Problems in Tea Plant Propagation
Ah, the joys of propagation! It’s not always a smooth sail, is it? We’ve all been there – staring
at a wilting cutting, wondering if we’ve committed some grievous horticultural sin. But don’t despair! At Growing Teas™, we’ve encountered (and overcome!) almost every propagation pitfall imaginable. This section is your battle
guide, helping you diagnose and fix the most common problems when propagating tea plants. Let’s turn those frowns upside down and get your tea babies thriving!
<a id=”51-fungal-infections-damping-
off-and-root-rot-solutions”>🦠 5.1 Fungal Infections: Damping Off and Root Rot Solutions
Fungal infections are the silent assassins of the propagation world. They can wipe out an entire tray of promising
seedlings or cuttings overnight. The culprits? Usually, too much moisture and not enough airflow.
-
The Problem: Stem Rot (Black Stem Base) & Damping Off
-
Symptoms: Cuttings turning black
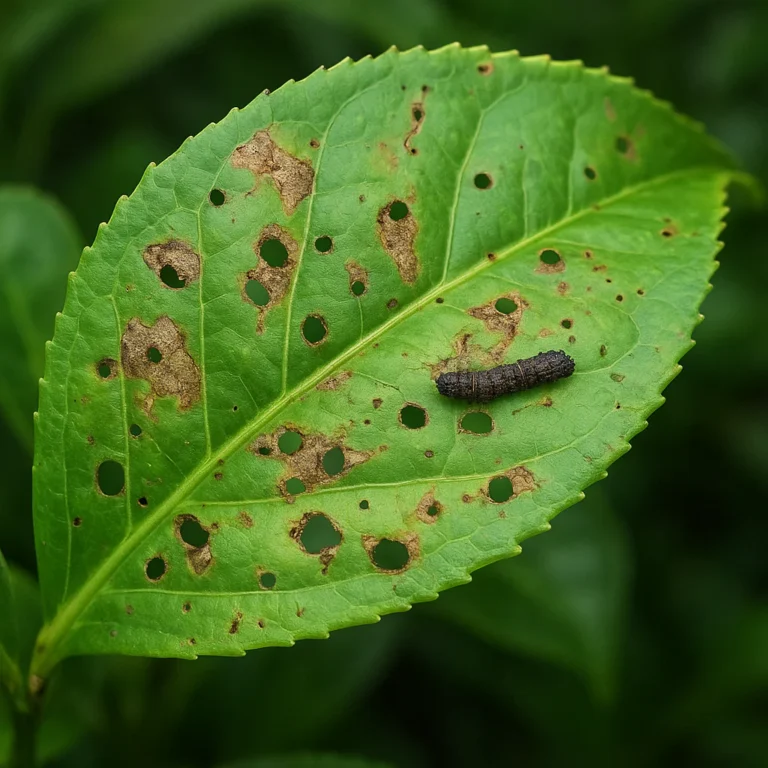
at the base. Seedlings suddenly collapsing at the soil line. A fuzzy, mold-like growth on the soil surface or stems. -
Cause: Overwatering, poor airflow, and excessively high humidity create
the perfect breeding ground for fungi like Pythium. “Cuttings turning black? Fungal rot. You probably kept them too wet.” -
Solution
: -
Immediate Action: Remove affected plants immediately to prevent spread.
-
Improve Drainage: Ensure your propagation medium is well-draining (e.g., 50% peat + 50% perlite).
-
Reduce Humidity: While high humidity is good, stagnant, saturated air is not. Crack your humidity dome vents by about 5mm to allow for airflow.
-
Bottom Watering: Switch to bottom-watering via capillary mats to keep the soil surface drier.
-
Bio-Fungicides: For persistent issues, consider applying bio-fungicides
like MycoStop. -
Sterile Medium: Always use a sterile propagation medium like perlite, vermiculite, or coarse sand to start.
The Problem: Powdery Mildew (White Fuzz on Leaves)
- Symptoms: White, powdery spots appearing on the leaves.
- Cause: Stagnant air and high humidity without adequate ventilation.
- Solution:
- Improve Airflow: Immediately increase air circulation by using a small fan or opening humidity dome vents more frequently.
- Baking Soda Spray
: Spray affected leaves with a solution of 1 tablespoon baking soda mixed with 1 quart of water. This can help change the leaf surface pH, making it less hospitable for the fungus.
<a id
=”52-wilting-and-leaf-drop-diagnosing-water-stress-and-humidity-issues”>🍂 5.2 Wilting and Leaf Drop: Diagnosing Water Stress and Humidity Issues
Seeing your
hopeful cuttings wilt can be heartbreaking. Is it too much water? Too little? It’s often a delicate balance.
-
The Problem: Cuttings Wilting (Despite Moist Soil)
-
Symptoms: Leaves drooping
, looking limp, even though the soil feels moist. -
Cause: This is often due to a wide vapor-pressure deficit (VPD) – the air is too dry relative to the plant’s moisture. The cutting is losing water through transpiration faster than its undeveloped roots can absorb it.
-
Solution:
-
Increase Humidity: Ensure your humidity dome is sealed effectively, aiming for 80
% relative humidity (RH). -
Regular Misting: Mist your cuttings twice daily to provide immediate foliar hydration.
-
Slight Venting:
While high humidity is crucial, slight nightly venting (e.g., 2mm crack) can help prevent condensation buildup while maintaining high RH. -
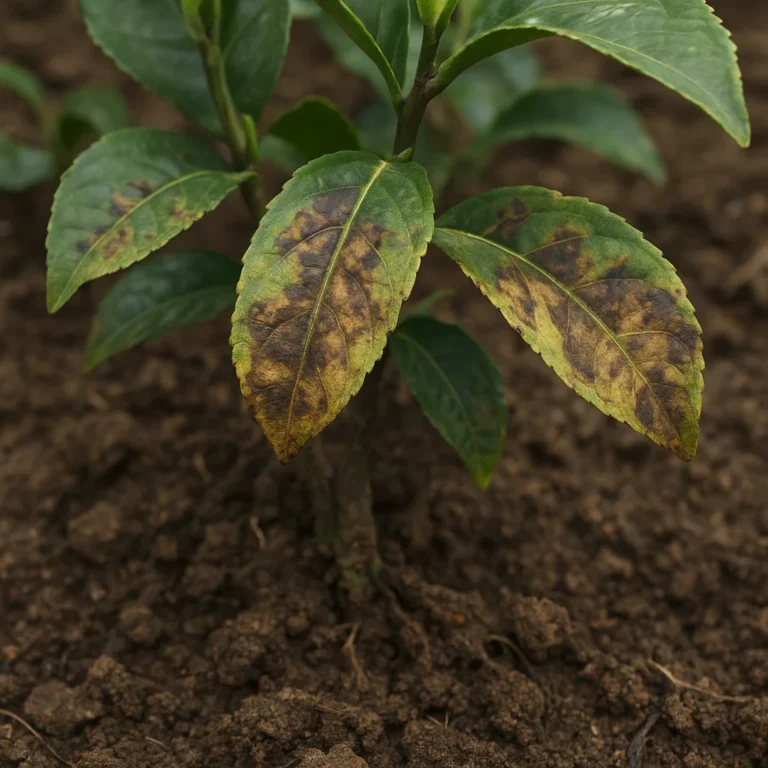
The Problem: Leaves Turning Brown at the Edges /
Leaf Cupping or Yellowing -
Symptoms: Leaf edges browning, leaves cupping upwards, or general yellowing (chlorosis).
-
Cause:
-
Low Humidity: ”
Leaves turning brown at the edges? Likely low humidity…” -
Salt Burn/Excess Fertilizer: “…or ‘salt burn’ from too much fertilizer.”
Alkaline Water/High pH:** “Tap water alkalinity ‘creeps up like a ninja,’ causing yellow ‘sulky’ leaves.” High soil pH (above 6.0) prevents nutrient uptake.
- Calcium Overload: Often linked to alkaline tap water.
- Solution:
- Increase Humidity: Use a plastic dome or misting
system. - Reduce Fertilizer: If fertilizing, cut back on frequency and concentration. Young cuttings and seedlings need very little.
- Switch Water Source: Ex
clusively use rainwater or distilled water to avoid alkalinity. - Test and Amend pH: Use a Sonkir Soil pH Tester to check your soil pH. If it’s too high, amend
with elemental sulfur or peat moss to lower it to the 4.5-5.5 range.
<a id=”53-pests-and-diseases-aphids-mites
-and-scale-insect-management”>🐜 5.3 Pests and Diseases: Aphids, Mites, and Scale Insect Management
Even in a controlled propagation environment, tiny invaders can sometimes find their way in. Regular
inspection is your best defense!
- The Problem: Aphids and Spider Mites
- Symptoms: Small green, black, or red insects on new growth (aphids). Fine webbing, tiny dots, and dis
colored leaves (spider mites). - Cause: Contaminated parent plant, unsterilized tools, or simply hitchhikers.
- Solution:
- Regular Monitoring: Inspect your plants daily,
especially the undersides of leaves. - Physical Removal: For small infestations, a strong spray of water can dislodge them.
- Organic Insecticides: For more severe cases, use organic insecticides like neem
oil or insecticidal soap. Always follow product instructions. - Sanitation: Keep your growing area clean and free of plant debris.
<a id=”54-root-failure-why
-cutings-refuse-to-take-hold”>🚫 5.4 Root Failure: Why Cuttings Refuse to Take Hold
This is perhaps the most frustrating problem: you do everything right, but no roots appear. What
gives?
-
The Problem: No Roots After 2 Months / Low Success Rates
-
Symptoms: Cuttings remain green but show no signs of root development after several weeks, or they eventually just decline
. -
Cause:
-
Impatience: “No roots after 2 months? Be patient! Tea is slow. Some cuttings take 4-6 months to fully establish.”
-
Lack of Rooting Hormone: Significantly reduces success rates.
-
Incorrect Cutting Type: Using overly soft or overly woody stems.
-
Inadequate Environment
: Insufficient warmth, inconsistent humidity, or poor light. -
Crushed Vascular Tissue: Caused by dull pruning shears.
-
Solution:
-
Be Patient! Tea plants are notoriously
slow. While roots might appear in 6-8 weeks, full establishment can take 4-6 months. -
Use Rooting Hormone: Products like Hormex #
3 or Clonex Purple can boost success rates dramatically. -
Select Proper Cuttings: Always use healthy semi-hardwood stems from the current season’s growth.
-
Optimize Environment: Ensure consistent temperatures (70-80°F) and high humidity (80-90% RH).
Sharp Tools:** Use clean, sharp pruning shears like the Felco F-2 to ensure clean cuts that don’t crush the stem’s vascular tissue.
<a id=”5-environmental-shock-
aclimatization-and-hardening-off-mistakes”>🌡️ 5.5 Environmental Shock: Acclimatization and Hardening Off Mistakes
You’ve successfully propagated your tea plants, they’re rooted and
growing, but then they suddenly decline after moving them. This is often environmental shock.
- The Problem: Post-Propagation Decline / Wilting After Transplant
- Symptoms: Healthy young plants suddenly wilt, leaves
brown, or growth stalls after being moved from the propagation environment. - Cause: Abrupt changes in humidity, temperature, or light intensity. Young plants grown in a protected, high-humidity environment are not ready for the harsh
realities of the outside world or a drier indoor climate. - Solution:
- Harden Off Gradually: This is a critical step! Over 1-2 weeks, slowly acclimate your plants to lower
humidity and direct light. - Start by gradually increasing the venting on your humidity dome.
- Then, remove the dome for short periods, gradually increasing the duration each day.
- Finally, move the plants
to a shaded outdoor spot for increasing periods before transplanting to their final location. - Maintain Moisture: Ensure the soil remains consistently moist during this transition, but not waterlogged.
- Avoid Extreme Weather: Don’t
harden off during periods of strong winds, intense sun, or extreme temperatures.
By understanding these common problems and implementing our expert solutions, you’ll be well on your way to a thriving nursery of young tea plants!
🧪 6. Advanced Techniques: Using Rooting Hormones and Growth Enhancers
While basic propagation methods can yield
good results, sometimes you need an extra edge, especially when dealing with stubborn varieties or aiming for higher success rates. This is where rooting hormones and growth enhancers come into play. Think of them as performance boosters for your tiny
tea plants! At Growing Teas™, we’ve seen firsthand how these tools can significantly improve your odds, turning a 35% success rate into a triumphant 85%.
6.1
The Magic of Rooting Hormones: What They Are and How to Use Them
Rooting hormones are synthetic or natural plant hormones (auxins) that stimulate root formation. The most common active ingredient is Indole-3-buty
ric acid (IBA).
Why Use Rooting Hormones?
-
Boost Success Rates: Dramatically increases the chances of your cuttings forming roots.
-
Faster Rooting: Accelerates the development of roots, shaving off precious time.
-
Stronger Root Systems: Often leads to a more robust and extensive root system, making the new plant more resilient.
Types of Root
ing Hormones:
- Powdered Hormones:
- Pros: Easy to apply, good for a quick dip.
- Cons: Can be washed off easily, may not provide consistent coverage
. - Our Pick: Hormex Rooting Hormone Powder #8 is fantastic for semi-hardwood cuttings of tea plants. They also offer different strengths, like Hormex #3
for semi-hardwood cuttings. - How to Use: Dip the cut end of your tea cutting into the powder, ensuring even coverage. Gently tap off any excess to prevent a “snow-covered
” stem, which can lead to rot.
- Gel Hormones:
-
Pros: Adheres well to the cutting, provides a protective seal, consistent hormone delivery.
-
Cons: Can be a bit messier, generally more expensive.
-
Our Pick: Clonex Purple (3,000 ppm IBA gel) is a highly effective option that we’ve had
great success with. -
How to Use: Dip the cut end of the cutting into the gel for a few seconds. The gel will coat the stem, providing continuous hormone contact.
Liquid Hormones:
- Pros: Can be used for quick dips or diluted for longer soaks.
- Cons: Requires careful measurement and can be prone to contamination if not handled properly.
Our Pick: Garden Safe TakeRoot (0.3% IBA liquid) is a readily available option.
- How to Use: Follow the product instructions for dilution and dipping time.
Important Tip: Always pour a small amount of rooting hormone into a separate container for dipping. Never dip your cuttings directly into the main container to avoid contaminating the entire supply.
6.2 Beyond Hormones: Other Growth Enhancers
While
rooting hormones are primary, other enhancers can support overall plant health and vigor during propagation.
- Mycorrhizal Fungi: These beneficial fungi form a symbiotic relationship with plant roots, extending their reach and improving nutrient and water uptake. While
not directly a rooting hormone, inoculating your propagation medium with mycorrhizae can lead to stronger, healthier root systems once established. Check out products like MycoStop for general fungal control and beneficial microbe introduction.
Seaweed Extracts (Kelp Meal/Liquid Kelp): Rich in trace minerals, amino acids, and natural plant growth regulators, seaweed extracts can reduce transplant shock and promote overall plant health. They can be used as a foliar
spray or added to your watering regimen.
- Humic and Fulvic Acids: These organic compounds improve nutrient availability, enhance soil structure, and stimulate microbial activity. They can be added to your watering solution to support root development and
plant vigor.
By strategically incorporating rooting hormones and other growth enhancers, you’re not just propagating; you’re optimizing for success, giving your tea plants the best possible start in their leafy lives.
🌍 7. Sustainable and Organic Practices in Tea Plant Propagation
At Growing Teas™, our passion for tea extends beyond the cup – it
encompasses a deep respect for the Earth. We believe that cultivating your own tea should be a harmonious process, one that nurtures both the plant and the planet. That’s why we champion sustainable and organic practices in every step of tea
plant propagation. It’s not just a trend; it’s a commitment to healthier plants, a healthier environment, and ultimately, healthier tea for you to enjoy.
7.1 Nurturing Nature: Why Organic Matters
Choosing
organic methods means working with nature, not against it. It’s about building a resilient ecosystem from the ground up.
- Healthier Plants: Organic practices promote stronger, more disease-resistant plants by fostering a rich
, living soil microbiome. - Environmental Stewardship: Reduces reliance on synthetic pesticides and fertilizers, protecting local ecosystems, water sources, and beneficial insects.
- Safer for You: No chemical residues on your homegrown tea leaves
!
7.2 Key Organic Propagation Strategies
- Source Sustainably:
- Parent Plants: If taking cuttings, ensure your parent tea plant has been grown organically.
- Seeds: Purchase
organic, non-GMO tea seeds from reputable suppliers. - Medium Components: Opt for sustainably harvested peat moss (or alternatives like coco coir), organic compost, and naturally sourced perlite or pine bark.
- Ster
ile, Natural Mediums:
- Instead of chemical sterilization, rely on naturally sterile components like perlite and vermiculite.
- For your soil mix, incorporate organic compost to introduce beneficial microbes, but
ensure it’s well-composted and screened to avoid pathogens. - Our DIY mix (40% pine bark, 30% peat, 20% perlite, 10% charcoal) is a great base
for organic propagation.
- Water Wisely:
- Rainwater Collection: This is the ultimate sustainable water source for tea plants, as it’s naturally soft and acidic. Install a rain barrel!
- Avoid Chemical Contaminants: Be mindful of tap water quality. If your tap water is heavily chlorinated or alkaline, consider filtering it or letting it sit out to off-gas.
Natural Pest and Disease Management:
- Prevention is Key: Healthy plants, good airflow, and proper sanitation are your first line of defense.
- Organic Solutions: For any pest outbreaks, reach for **
organic insecticides** like neem oil or insecticidal soap. For fungal issues, explore bio-fungicides or simple baking soda solutions. - Beneficial Insects: Encourage natural predators in your garden
by planting companion flowers.
- Composting and Nutrient Cycling:
- Closed-Loop System: Create your own compost from kitchen scraps and garden waste. This provides nutrient-rich, organic amendments for your established
tea plants and helps reduce waste. - Organic Fertilizers: Once your tea plants are established, use organic fertilizers like aged compost, worm castings, or organic acid-loving plant food to provide nutrients. Remember, young propag
ations need very little!
- Energy Efficiency:
- If using grow lights, opt for energy-efficient LEDs like the Barrina T5 or dimmable Spider-Farmer SF1000
. - Utilize natural light whenever possible, supplementing only when necessary.
By embracing these sustainable and organic practices, you’re not just growing tea; you’re cultivating a legacy of environmental responsibility and a deeper
connection to the natural world. It’s a journey that’s as rewarding as the first sip of your homegrown brew!
📅 8. Timeline and Growth Stages: From Propagation to First Harvest
Patience, dear grower, is not just a virtue in tea propagation; it’s a prerequisite! Unlike some fast-growing herbs
, Camellia sinensis takes its sweet time. But oh, the reward is worth every moment of anticipation! Understanding the timeline and various growth stages will help you set realistic expectations and celebrate each milestone on your journey from a tiny cutting or
seed to a tea-producing bush.
Here at Growing Teas™, we’ve charted this journey countless times, and while nature always throws a curveball or two, this general roadmap will guide you.
8.1 The Propagation
Phase: The Genesis of Your Tea Plant
This is where the magic (and sometimes the frustration!) begins.
- Cuttings:
- Root Initiation: You can expect to see the first signs of roots
appearing in 6-8 weeks. These are often tiny, delicate white nubs. - Root Establishment: For the roots to be strong enough for transplanting, it can take anywhere from 4-
6 months. This is a crucial period where consistency in humidity and temperature is paramount. - Hardening Off: Once a robust root ball has formed, begin the 1-2 week hardening
-off process (see Section 5.5) to acclimate your new plant to its future environment. - Seeds:
- Stratification: If required, the cold-moist stratification period typically lasts 3
0 days. - Germination: After stratification and planting, expect germination to occur within 4-6 weeks under optimal conditions. Remember, seed viability can be
a factor. - Seedling Growth: Young seedlings will be delicate and require consistent care, similar to rooted cuttings, for several months before they are robust enough for transplanting.
- Layer
ing: - Root Formation: This method is slower but often more reliable. Roots can take 6-12 months to form within the moss ball before the new plant can be separated from the parent.
8.2 The Nursery Stage: Growing Pains and Gains
Once your cuttings are rooted or seeds have germinated and hardened off, they enter the nursery stage, where they grow into young, independent plants.
Initial Growth: For the first 6-12 months after successful propagation, your young tea plants will focus on developing a strong root system and putting out new foliage. Growth can seem slow at first, but don’t be discouraged
!
- Potting Up: As your plants grow, they will need to be gradually moved into larger pots. Start with 4-6 inch pots, then move to 1-gallon containers, and eventually larger as they mature.
This prevents them from becoming root-bound. - Nutrient Needs: Young tea plants don’t need heavy feeding. A balanced, acidic organic fertilizer applied sparingly is usually sufficient once they are actively growing. Remember their preference for acidic soil (pH 4.5-5.5).
8.3 The Establishment Phase: Settling In for the Long Haul
This is when your tea plants truly become part of your garden or
larger container setup.
- Transplanting: Once your tea plants are robust (typically 1-2 years old from propagation), they can be transplanted to their final growing location, whether that’s a dedicated tea garden or a large planter
. Ensure the soil in their new home also meets their acidic pH requirements. - Bush Development: Over the next 1-2 years, the plants will continue to grow and branch out, forming the classic tea bush shape. Regular
pruning (light shaping, not harvesting) can encourage bushiness.
8.4 The Harvest Horizon: Your First Cup of Homegrown Tea!
This is the moment you’ve been dreaming of!
- First Harvest
(Cuttings/Layering): For plants propagated from cuttings or layering, you can typically expect your first light harvest in 2-3 years. This will be a small yield, as the plant is still
maturing. - First Harvest (Seeds): Seed-grown plants, due to their slower development and genetic variability, usually take longer, with the first harvest expected in 3-5 years.
- Full Production: A tea plant typically reaches its full production potential around 5-7 years of age, continuing to produce for decades with proper care.
| Propagation Method | Success Rate | Time to First Harvest
| Notes |
| :—————– | :———-: | :——————-: | :————————————- |
| Stem Cuttings | 70–90% | 2
–3 years | Genetically identical to parent. |
| Seed Propagation | 50–70% | 3–5 years | Genetic variability (the “lottery”). |
| Air Layering | 60–80% | 1–2 years
| Larger plant from the start. |
So, while the journey from propagation to your first cup of homegrown tea is a marathon, not a sprint, each stage is filled with learning and the quiet satisfaction of nurturing life. And trust
us, that first sip of tea from your very own bush? Absolutely priceless!
🧑 🌾 9
. Personal Stories and Anecdotes from Growing Teas™ Experts
Here at Growing Teas™, we’re not just experts; we’re passionate tea growers who’ve faced every challenge and celebrated every tiny victory alongside our *Camellia sinensis
- babies. We believe that sharing our personal experiences, the good, the bad, and the slightly embarrassing, is the best way to truly connect and teach. After all, what’s a journey without a few memorable stories?
The Case of the Crispy Confetti
“I’ll never forget our intern, bless his heart,” chuckles our lead horticulturist, Maya. “He was so enthusiastic about his first batch of tea cuttings. He’d meticulously
prepared the medium, chosen perfect semi-hardwood stems, and even applied the rooting hormone like a pro. Everything was going swimmingly under the humidity dome… until he forgot to vent it for a full 24 hours. The next
morning, we walked into the propagation room, and instead of lush green leaves, we found what he affectionately termed ‘crispy leaf confetti.’ The stagnant, super-saturated air, combined with the warmth, had essentially cooked the poor things and
invited every fungus imaginable. He was devastated. We still quote him: ‘Don’t be that intern.’ It was a harsh lesson, but it really hammered home the importance of airflow and proper venting,
even when aiming for high humidity. Now, we have a strict ‘venting buddy system’!”
The Ninja Alkalinity Attack
Our founder, David, recounts a particularly perplexing period: “We had a batch of beautiful young seedlings,
looking vibrant one week, then suddenly, their leaves started to yellow, and they looked… sulky. We checked for pests, adjusted light, even sang them lullabies – nothing! It was driving us mad. Then we remembered a tid
bit from a soil science seminar: ‘Tap water alkalinity creeps up like a ninja.’ We’d been using our regular tap water, assuming it was fine. But over time, the dissolved minerals, particularly calcium, had slowly
raised the soil pH. Our tea plants, being the acid-loving divas they are, couldn’t absorb nutrients. We switched to rainwater exclusively, and within a few weeks, they perked right up. It was a powerful
reminder that sometimes the most insidious problems are the ones you can’t immediately see, lurking in your water supply.” You can read more about organic farming techniques on our blog.
The Patience Test that Paid Off
Sarah, our resident tea sommelier and a keen home grower, shares her tale of patience: “My first attempt at propagating from cuttings was… humbling. I was so excited,
checking them daily, practically willing roots to appear. After two months, nothing. I was convinced I’d failed. I even considered tossing them. But then I remembered what we always tell our community: ‘Tea is slow. Some cuttings take
4-6 months to fully establish.’ I decided to just leave them be, maintain the humidity, and focus on other tasks. Lo and behold, at almost the five-month mark, I saw the tini
est white roots peeking out! It was a profound lesson in trusting the process and understanding the plant’s natural rhythm. That batch eventually gave me some of my most robust tea bushes, which now contribute to my DIY tea blending experiments.”
These stories, filled with both triumphs and tribulations, are a core part of the Growing Teas™ experience. They remind us that while
science and technique are crucial, a good dose of observation, patience, and a willingness to learn from our mistakes are equally vital ingredients in the art of tea plant propagation. We’re all in this leafy journey together!